I write to you while listening to a performance of Vexations, a piece by the avante-garde French composer Eric Satie. Known for his music jokes and disdain for the "established" musical ways of doing things, scholars are unsure if Vexations was ever actually meant to be performed. The piece was not published during his lifetime, but was found by the American composer John Cage among Satie's papers.
Set outside tonal harmony, the theme is based largely on repeating various tritones. The music consists of a theme, variation 1, and variation 2 which are to be repeated 840 times; a feat which generally takes over 12 hours to perform. The piece never having been published and the fact that it takes so long to perform has led some to wonder if Satie wrote the piece as a joke.
No instrumentation is given and, given the length, it is common for performers to switch off. There is a slight pause at the end of the theme and the end of each variation, which makes the switch possible. I have heard a flute choir, string quartet, and a vibe arrangement today.
I performed my half hour slot with another clarinetist and a guitar. Performing the piece was trance like, a kind of outer body experience, and the half hour slot flew by. Looking back now, it might have been nice to have a longer time period to perform.
Over time the melody starts to become oddly familiar. I can hear if a performer makes a wrong note even though the theme is so difficult to listen to on its own. It is an entirely different musical experience from what I normally perform or listen to.
Of course, I brought my knitting. It seemed like the perfect activity to do while listening to the repetitive nature of the piece. After I finish this post I will pick up my sock knitting. I'm using the vintage dark blue yarn that I wrote about a few posts ago to make a river inspired pattern. Oh, I finished a pair of socks! It's my first finished pair in quite some time. Don't they look like mermaid scales? Lurvly.
They are Pomatomus by Cookie A. She is a genius, in case you didn't know that already.
These were the first pair that I knit on my new size 2 Lantern Moon sock needles. I'm really enjoying working with those needles. They feel like butter. Sometimes I worry they are going to melt while I'm using them.
Knitting to music is one of my favorite things. I particularly enjoy listening to the soundtrack to Lost in Translation for some reason. Luckily for me my homework often consists of listening to music, so I can knit while doing homework!
If you have the opportunity to hear a performance of Vexations you should go! It's so different, and performances don't happen too often. If you go, make sure to smile a little, knowing that Satie probably meant for at least part of it to be silly.
Sunday, February 20, 2011
Sunday, February 6, 2011
Cookies and Pansies
My cookies it has been a long time since I've updated! Can you tell I started another semester at school? I also got a new job as a tutor for a local community college in their Math and Read/Writing Tutoring Centers.
This is my last semester of my Bachelor's degree. It has been a long journey, but I am very excited to be so near done with the degree. I will be getting my credential after this semester, so I won't be quite done with school.
A few days ago one of my classmates told me they think I'll be a great music teacher. I think I will be too, but it is nice to hear that someone else thinks so too.
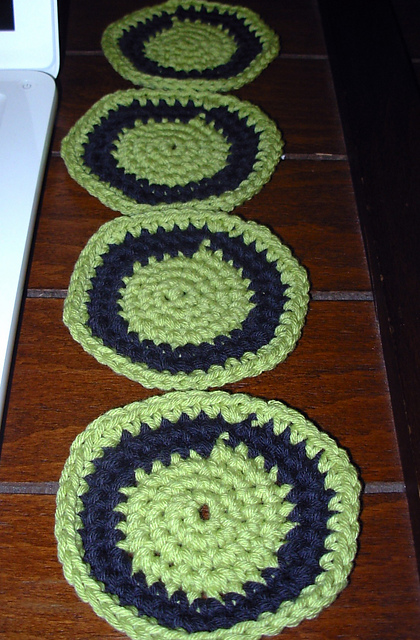
In knitting news, none of my yarn and needles were cooperating last month. I really want to make Road to Golden, a pullover sweater with a stranded colorwork pattern. I swatched for a couple of days, knit and reknit, but none of the combinations I came up with would work. Then I tried to make a Musica fingerless glove, but the two yarns which were the same brand were different sizes and looked icky. I told my needles and wool that they were being very bad, got out some cotton and a crochet hook and crocheted some coasters.
I also finished sewing on the snaps to my Cable for Jeans sweater. Someone else had used snaps instead of buttons, and I thought it was a nifty idea. It took a while to get the hang of it, but eventually I got it. I used the Knitmore Girls button tutorial videos to sew on the grosgrain ribbon. The videos are a bit wobbly and lengthy, but they are great learning tools. I am going to use their method for sewing on buttons from now on. The best part about having the snaps sewed on is that I can actually wear it. Even though I live in Southern California, I am a pansy and the mornings seem very cold for me and the sweater keeps me perfectly warm.
I have some socks in the works, two are patterns of Cookie A. I'm sure I'll be letting you know how that goes!
This is my last semester of my Bachelor's degree. It has been a long journey, but I am very excited to be so near done with the degree. I will be getting my credential after this semester, so I won't be quite done with school.
A few days ago one of my classmates told me they think I'll be a great music teacher. I think I will be too, but it is nice to hear that someone else thinks so too.
In knitting news, none of my yarn and needles were cooperating last month. I really want to make Road to Golden, a pullover sweater with a stranded colorwork pattern. I swatched for a couple of days, knit and reknit, but none of the combinations I came up with would work. Then I tried to make a Musica fingerless glove, but the two yarns which were the same brand were different sizes and looked icky. I told my needles and wool that they were being very bad, got out some cotton and a crochet hook and crocheted some coasters.
These are to replace the cardboard pieces Terri and I
had been using as coasters. These are much better.
I also finished sewing on the snaps to my Cable for Jeans sweater. Someone else had used snaps instead of buttons, and I thought it was a nifty idea. It took a while to get the hang of it, but eventually I got it. I used the Knitmore Girls button tutorial videos to sew on the grosgrain ribbon. The videos are a bit wobbly and lengthy, but they are great learning tools. I am going to use their method for sewing on buttons from now on. The best part about having the snaps sewed on is that I can actually wear it. Even though I live in Southern California, I am a pansy and the mornings seem very cold for me and the sweater keeps me perfectly warm.
I have some socks in the works, two are patterns of Cookie A. I'm sure I'll be letting you know how that goes!
Tuesday, January 18, 2011
Buttons, Leaflets, Yarn, and Men Selling Crafting Supplies
My mom, stepdad, and I occasionally like to go to the Long Beach Outdoor Antique Market that happens every third Sunday of the month. It is kind of like a swap meet, except there are a lot more things that are genuinely old. Yesterday it was just my mom and I out in the sunny day looking for our version of a great find.
One booth had a selection of old dilapidated tools in every size and shape imaginable. Another had a collection of various salt shakers ranging from the 40's to the 60's. One of my mom's favorite sellers is a booth where anything on the table to $5. Walking down the center aisle we come to a booth that sells nothing but prints from books, back when most things were illustrated. The farther back into the sale you go the newer things get until by the end some of the booths look straight out of the swap meet.
Many of the booths are a hodgepodge of things and of course there are those people trying to trick and deceive. One sign said "Fat quarters. Civil War. $8." We took a feel of the fabric and knew instantly they were modern fabrics. The sign doesn't say they actually are from the Civil War, but the implication is there. Tricky aren't they?
My mom loves dolls. She loves buying them, selling them, but most of all, repairing them. She is usually hunting for doll related things and I hunt for knitting related items. On this day we found a large sink sized basin full of buttons. "Fill a box for $3. Two boxes for $5." Score! A set of new buttons alone is usually at or more than $3, and many of these buttons were fun vintage styles. We spent quite some time having fun riffling through their bin picking out buttons. I picked out some sets I might be able to use for sweaters and my mom picked out the teeny tiny ones to use for dolls.
Of course what I'm usually looking for is vintage yarn or needles. I've gotten lucky a couple of times at thrift stores, and on a previous visit to the Outdoor Antique Market I found a few balls of Knit Picks. Yesterday I spotted a small bin on the ground with knitting needles poking out. The bin contained a decent stack of vintage pattern books, mostly for crochet doilies, some vintage circular knitting needles, and a few balls of vintage 100% virgin wool sock yarn.
Using a technique I learned from watching too many episodes of American Pickers I picked out a set of the circular knitting needles, the navy blue sock yarn, and a couple of the leaflets. This is called bundling, and means that you get things for cheaper than they would otherwise have been. The seller gave me the lot for $3. I was all ready to practice bargaining and then he gave me such a low price!
I chose a leaflet from the early 60's called Bernat Raglans and a Doilies booklet from 1956. When I showed my mom the Raglans leaflet she said, "Don't tell me, um, 62?" She was one year off, 1961. One of the raglans is made of mohair and she told me about how she and her friends all had to have one of those sweaters when she was in middle school. These kinds of things are great for inspiration and I have a feeling my little collection of vintage leaflets will keep growing.
I am very excited about the yarn. A lot of vintage yarn is acrylic, because it was the cool new thing when they started making it. Finding vintage yarn that is 100% wool is a real treasure. Not only that, the yarn is soft and the two balls means there will be enough for a pair of socks.
These kinds of days, where the sun is brilliant and the sky turns a richer blue, the days I get to spend with my mom, these are the days to remember.
One booth had a selection of old dilapidated tools in every size and shape imaginable. Another had a collection of various salt shakers ranging from the 40's to the 60's. One of my mom's favorite sellers is a booth where anything on the table to $5. Walking down the center aisle we come to a booth that sells nothing but prints from books, back when most things were illustrated. The farther back into the sale you go the newer things get until by the end some of the booths look straight out of the swap meet.
Many of the booths are a hodgepodge of things and of course there are those people trying to trick and deceive. One sign said "Fat quarters. Civil War. $8." We took a feel of the fabric and knew instantly they were modern fabrics. The sign doesn't say they actually are from the Civil War, but the implication is there. Tricky aren't they?
My mom loves dolls. She loves buying them, selling them, but most of all, repairing them. She is usually hunting for doll related things and I hunt for knitting related items. On this day we found a large sink sized basin full of buttons. "Fill a box for $3. Two boxes for $5." Score! A set of new buttons alone is usually at or more than $3, and many of these buttons were fun vintage styles. We spent quite some time having fun riffling through their bin picking out buttons. I picked out some sets I might be able to use for sweaters and my mom picked out the teeny tiny ones to use for dolls.
My collection. I love the navy blue/white ones.
They would look so cute on a little sailor sweater!
Of course what I'm usually looking for is vintage yarn or needles. I've gotten lucky a couple of times at thrift stores, and on a previous visit to the Outdoor Antique Market I found a few balls of Knit Picks. Yesterday I spotted a small bin on the ground with knitting needles poking out. The bin contained a decent stack of vintage pattern books, mostly for crochet doilies, some vintage circular knitting needles, and a few balls of vintage 100% virgin wool sock yarn.
Using a technique I learned from watching too many episodes of American Pickers I picked out a set of the circular knitting needles, the navy blue sock yarn, and a couple of the leaflets. This is called bundling, and means that you get things for cheaper than they would otherwise have been. The seller gave me the lot for $3. I was all ready to practice bargaining and then he gave me such a low price!
I chose a leaflet from the early 60's called Bernat Raglans and a Doilies booklet from 1956. When I showed my mom the Raglans leaflet she said, "Don't tell me, um, 62?" She was one year off, 1961. One of the raglans is made of mohair and she told me about how she and her friends all had to have one of those sweaters when she was in middle school. These kinds of things are great for inspiration and I have a feeling my little collection of vintage leaflets will keep growing.
Raglan sweater 1961.
Doily from 1956. Gotta love the drawing!
I am very excited about the yarn. A lot of vintage yarn is acrylic, because it was the cool new thing when they started making it. Finding vintage yarn that is 100% wool is a real treasure. Not only that, the yarn is soft and the two balls means there will be enough for a pair of socks.
These kinds of days, where the sun is brilliant and the sky turns a richer blue, the days I get to spend with my mom, these are the days to remember.
Sunday, January 9, 2011
The Traveler's Way - Part 1 - Destination: New Zealand
I am a traveler. A person who enjoys experiencing new places, seeing new views, eating different food.
I do not enjoy, however, being a tourist. I find that the majority of tourist destinations are boring and overpriced. When I was at the Louvre in Paris I decided to spend my hour looking at all the other wonderful items they have there rather than spend that hour waiting in line to look at the Mona Lisa for ten seconds.
The problem with tourist destinations and the reason I am libel to pass them by is that they often have nothing to do with a sense of place. What I am most interested in at a destination is the experience of that place.
The highlight of my traveling experience was the year I studied abroad in New Zealand. It is partially due to the fact that I spent so much time there that I really was able to experience the place. That, and the week I spent on the llama farm.
In this short series of blog posts on traveling I will give you some advice should you find tourism as overpriced and boring as I do.
First, go to New Zealand. Out of the major cities, many of the places are very down to earth and easy to access as long as you can manage to drive on the other side of the road.
For example, my geography class on Rivers and Slopes took a field trip and hiked to the place where they filmed part of the Lord of the Rings. There was no one else there but our class and we were able to see where they filmed the scene where Aragorn, Legolas, and Gimli are heading into the cursed mountain where the dead reside. Remember that part? Geek alert!
Second, sign up for WWOOF and stay on a farm for a week. New Zealand is a largely agricultural economy. Much of their recent history is agricultural in nature and much of their culture is wrapped in sheep and cows. To give you an idea, last time I checked there were 4 million people in New Zealand and 40 million sheep. That's 10 sheep for every 1 person.
It fits then that to really experience New Zealand, staying on a working farm would give you the best taste of what the country is all about. WWOOF stands for Willing Workers on Organic Farms and is an organization that connects travelers and organic farms together. In exchange for lodging and food from the farm host the traveler agrees to give the farm 4-6 hours of work each day.
"WWOOF New Zealand is part of a world wide community that promotes awareness of ecological farming practices by providing volunteers with the opportunity to live and learn on organic properties. WWOOF is an enjoyable, educational and safe way to explore and get to know the people in the country."
There is a fee to sign up as a traveler and after you have done that you can look at postings by farms looking for help. There are all kinds of farms and all kinds of people. This would be a great way to finally learn about composting or organic farming practices if you have always been curious.
I was fortunate enough to sign up and stay on a llama and alpaca farm. The second day I was there the host, Elise, and I went to a nearby elementary school's farm day. The children each had an animal, either a calf or a lamb that they were to have trained. It was very cute to see the different personalities of the children and how they interacted with their animals.
Elise was asked to bring some of her llamas to the fair day, mostly because it's cool to have llamas around. I was in charge of Cesar all day. It was one of the highlights of my trip because I love animals, Cesar was a sweetie, and I got to talk to New Zealanders all day about llamas.
It was a very kiwi experience, my week on that farm, and I highly recommend it to anyone considering traveling to New Zealand.
I do not enjoy, however, being a tourist. I find that the majority of tourist destinations are boring and overpriced. When I was at the Louvre in Paris I decided to spend my hour looking at all the other wonderful items they have there rather than spend that hour waiting in line to look at the Mona Lisa for ten seconds.
The problem with tourist destinations and the reason I am libel to pass them by is that they often have nothing to do with a sense of place. What I am most interested in at a destination is the experience of that place.
The highlight of my traveling experience was the year I studied abroad in New Zealand. It is partially due to the fact that I spent so much time there that I really was able to experience the place. That, and the week I spent on the llama farm.
In this short series of blog posts on traveling I will give you some advice should you find tourism as overpriced and boring as I do.
First, go to New Zealand. Out of the major cities, many of the places are very down to earth and easy to access as long as you can manage to drive on the other side of the road.
For example, my geography class on Rivers and Slopes took a field trip and hiked to the place where they filmed part of the Lord of the Rings. There was no one else there but our class and we were able to see where they filmed the scene where Aragorn, Legolas, and Gimli are heading into the cursed mountain where the dead reside. Remember that part? Geek alert!
Second, sign up for WWOOF and stay on a farm for a week. New Zealand is a largely agricultural economy. Much of their recent history is agricultural in nature and much of their culture is wrapped in sheep and cows. To give you an idea, last time I checked there were 4 million people in New Zealand and 40 million sheep. That's 10 sheep for every 1 person.
It fits then that to really experience New Zealand, staying on a working farm would give you the best taste of what the country is all about. WWOOF stands for Willing Workers on Organic Farms and is an organization that connects travelers and organic farms together. In exchange for lodging and food from the farm host the traveler agrees to give the farm 4-6 hours of work each day.
"WWOOF New Zealand is part of a world wide community that promotes awareness of ecological farming practices by providing volunteers with the opportunity to live and learn on organic properties. WWOOF is an enjoyable, educational and safe way to explore and get to know the people in the country."
There is a fee to sign up as a traveler and after you have done that you can look at postings by farms looking for help. There are all kinds of farms and all kinds of people. This would be a great way to finally learn about composting or organic farming practices if you have always been curious.
I was fortunate enough to sign up and stay on a llama and alpaca farm. The second day I was there the host, Elise, and I went to a nearby elementary school's farm day. The children each had an animal, either a calf or a lamb that they were to have trained. It was very cute to see the different personalities of the children and how they interacted with their animals.
Elise was asked to bring some of her llamas to the fair day, mostly because it's cool to have llamas around. I was in charge of Cesar all day. It was one of the highlights of my trip because I love animals, Cesar was a sweetie, and I got to talk to New Zealanders all day about llamas.
It was a very kiwi experience, my week on that farm, and I highly recommend it to anyone considering traveling to New Zealand.
Sunday, January 2, 2011
Knitting Needle Boogie Monster! Rarr!
You better watch out, or the knitting needle boogie monster is going to get you!
Rarr!
These are one of Terri's Christmas presents. They weren't finished when Christmas came galumphing up the corner so I wrapped them up with the needles still attached. In the picture above I had Terri try the glove on to make sure they fit and Terri thought it was funny so she had me take pictures. If you didn't know what's going on I concede that the picture may result in fright.
Terri's hands are always cold in the winter. Store bought gloves don't work well because her hands are small and they seem to only sell pairs made out of acrylic in Southern California. Because her hands are cold she sticks them on my neck to get warm. Brr! To save my neck I decided to make her some gloves.
The pattern is called Knotty Gloves and is by Julia Mueller. Terri is not one for the princess look, and many of the glove patterns I found were of the "I'm a pretty, pretty princess" variety. I was very happy to find this pattern, which could easily be dressed up in pink for the princess look or dressed down in a dark green for a less frilly look.
Of course the pattern only comes in women's size large. I did some minor calculations and fudging to make a smaller version. The cable pattern isn't exactly centered anymore, but I decided that it wouldn't really matter. No one flying by on a fast horse is going to notice.
Knitting the fingers reminds me of some of the amigurumi crafting I have done before with the small parts. I also figured out that when I use double pointed needles I waste a lot of time when I end one needle and move to the next one because I usually drop the working yarn and have to pick it back up again. Watching myself knit and trying to change habits is difficult but worthwhile when I'm knitting such small tubes and am constantly switching needles.
Does Terri really deserve a pair of hand knit gloves? Well, she made me a swift for Christmas.
So yes, yes she does.
Rarr!
These are one of Terri's Christmas presents. They weren't finished when Christmas came galumphing up the corner so I wrapped them up with the needles still attached. In the picture above I had Terri try the glove on to make sure they fit and Terri thought it was funny so she had me take pictures. If you didn't know what's going on I concede that the picture may result in fright.
Terri's hands are always cold in the winter. Store bought gloves don't work well because her hands are small and they seem to only sell pairs made out of acrylic in Southern California. Because her hands are cold she sticks them on my neck to get warm. Brr! To save my neck I decided to make her some gloves.
The pattern is called Knotty Gloves and is by Julia Mueller. Terri is not one for the princess look, and many of the glove patterns I found were of the "I'm a pretty, pretty princess" variety. I was very happy to find this pattern, which could easily be dressed up in pink for the princess look or dressed down in a dark green for a less frilly look.
Of course the pattern only comes in women's size large. I did some minor calculations and fudging to make a smaller version. The cable pattern isn't exactly centered anymore, but I decided that it wouldn't really matter. No one flying by on a fast horse is going to notice.
Knitting the fingers reminds me of some of the amigurumi crafting I have done before with the small parts. I also figured out that when I use double pointed needles I waste a lot of time when I end one needle and move to the next one because I usually drop the working yarn and have to pick it back up again. Watching myself knit and trying to change habits is difficult but worthwhile when I'm knitting such small tubes and am constantly switching needles.
Does Terri really deserve a pair of hand knit gloves? Well, she made me a swift for Christmas.
So yes, yes she does.
Sunday, December 26, 2010
Miss Mohair: The Story of a Discarded Yarn
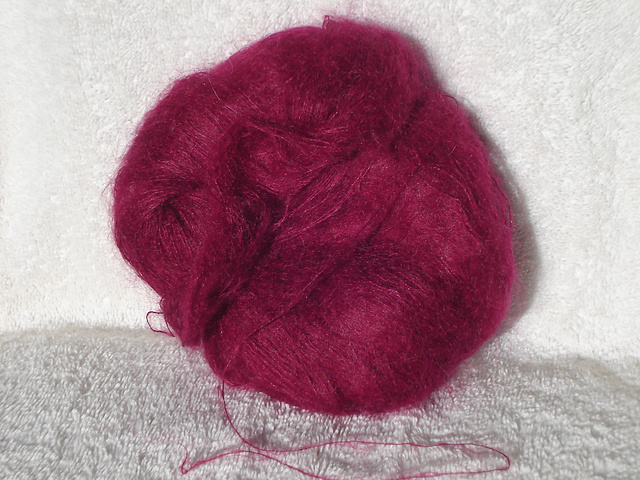
I love thrift stores. I love that I can find awesome things for super cheap. I love the hunt, the search for the great find hiding behind racks of muumuus. I always look for yarn. I have heard of people finding sweater quantities of cashmere/wool yarn at thrift stores for unbelievably cheap. While I have not been that lucky, many years ago I did find this:
I was sure it was good quality lace weight mohair. What I was unsure about was how to use it. I had no idea how much yardage might be in the ball or what I might want to make out of it. And so it pulled up a chair in my stash with some other yarns and commisorated.
"What are you in for?"
"Bulky black and white boucle. I'm too 'busy' for her. Whatever that means."
"How long have you been in here?"
"Five years," the boucle bragged, thinking it had been here longer than the rest.
"Six," said the mohair, "she doesn't even have an Idea for me."
The others gasped. "Really? Not even an Idea? Tsk..."
That's quite enough of that Miss Mohair, because I did think of and execute an Idea this year. I made a small neck scarf for my mother for Christmas. While she is not necessarily the pink person, she does like red and I found the mohair to be a deep enough pink that I decided she would likely wear it. The danger here was that the gift was a surprise and I had no opportunity to play 20 questions in order to figure out something the receipient would certainly wear.
"Are you cold?"
"Where are you cold?"
"Do you like blue? Coral? Teal? Beige?"
"Fringe or no fringe?"
"Long or short?"
"Is there a button shape you like?"
"What are your thoughts on the sizes of button holes?"
Instead I played with fire and knit on the fly. As I'm sure you know by know I am making valiant attempts to get my stash under control, which is how I came to think of an Idea for Miss Mohair. I would make a small neck scarf for my mom. Swatching in mohair is difficult because ripping it out causes pain in my heart as the fibers rip apart; so I just cast on for feather and fan and prayed my knitting mojo would be with me.
For the most part it was. I knit about six inches of feather and fan, looked down and decided it was difficult to see the pattern. Despite being a lace weight yarn knit on size four needles the mohair in the yarn was disguising the pattern. It was too late to go back and jump up three needles sizes so I plunged on ahead.
In order to make the pattern more noticeable I decided to add in some stripes of stockinette. This was a good decision because it made the knitting easier and the ripple of the feather and fan pattern showed up better. I really like the pattern that developed from this problem. I would not have added the stockinette stripes otherwise. I will knit this pattern again in a yarn better suited for it.
Best of all, my mom likes it.
(Miss Mohair is in a new home in my box of leftover balls and is settling in nicely.)
I was sure it was good quality lace weight mohair. What I was unsure about was how to use it. I had no idea how much yardage might be in the ball or what I might want to make out of it. And so it pulled up a chair in my stash with some other yarns and commisorated.
"What are you in for?"
"Bulky black and white boucle. I'm too 'busy' for her. Whatever that means."
"How long have you been in here?"
"Five years," the boucle bragged, thinking it had been here longer than the rest.
"Six," said the mohair, "she doesn't even have an Idea for me."
The others gasped. "Really? Not even an Idea? Tsk..."
That's quite enough of that Miss Mohair, because I did think of and execute an Idea this year. I made a small neck scarf for my mother for Christmas. While she is not necessarily the pink person, she does like red and I found the mohair to be a deep enough pink that I decided she would likely wear it. The danger here was that the gift was a surprise and I had no opportunity to play 20 questions in order to figure out something the receipient would certainly wear.
"Are you cold?"
"Where are you cold?"
"Do you like blue? Coral? Teal? Beige?"
"Fringe or no fringe?"
"Long or short?"
"Is there a button shape you like?"
"What are your thoughts on the sizes of button holes?"
Instead I played with fire and knit on the fly. As I'm sure you know by know I am making valiant attempts to get my stash under control, which is how I came to think of an Idea for Miss Mohair. I would make a small neck scarf for my mom. Swatching in mohair is difficult because ripping it out causes pain in my heart as the fibers rip apart; so I just cast on for feather and fan and prayed my knitting mojo would be with me.
For the most part it was. I knit about six inches of feather and fan, looked down and decided it was difficult to see the pattern. Despite being a lace weight yarn knit on size four needles the mohair in the yarn was disguising the pattern. It was too late to go back and jump up three needles sizes so I plunged on ahead.
In order to make the pattern more noticeable I decided to add in some stripes of stockinette. This was a good decision because it made the knitting easier and the ripple of the feather and fan pattern showed up better. I really like the pattern that developed from this problem. I would not have added the stockinette stripes otherwise. I will knit this pattern again in a yarn better suited for it.
Best of all, my mom likes it.
(Miss Mohair is in a new home in my box of leftover balls and is settling in nicely.)
Monday, December 20, 2010
Bamboo Wind Chime Tutorial
Has it only been one day since my last post? Yes! I'm out of school right now so my blog is going to feel the love!
I decided to make some bamboo wind chimes as gifts for various people in my life. The pole cost $3.75, I made two wind chimes out of it, and the process only took a couple of hours.
I'm not an avid wood worker and I'm not a professional. I had fun making this and I hope you do too! However, don't expect perfect results.
I did all of this at my kitchen table!
If you have questions please feel free to comment. All comments are emailed to me. I may edit this from time to time to clarify.
There are some tutorials online here and there, but nothing that I really liked, so I made up my own. Without further ado, here is the Bamboo Wind Chime Tutorial.
Materials
I bought a length of bamboo from my local hardware store in the outdoor section. They have bamboo there that gardeners use for stakes. I found the pole with the largest diameter I could get, which was about 1". A pole with a larger bore would likely be easier to work with.
All of the tools I used can be found at a hardware store or in the garage of a handy person in your life (I used all of Terri's tools).
Step 2: Decide on graduated lengths that you will cut into the bamboo.
The length of the bamboo will affect the pitch that it sounds. It is best to have 1 1/2" or more of a difference between each length.
My 1/2" drill bit is a little over 4" long. Since later in the process I am going to drill out the bore of the bamboo the longest piece can't be more than 8". If you have an extension for your drill bits your longest piece can be longer.
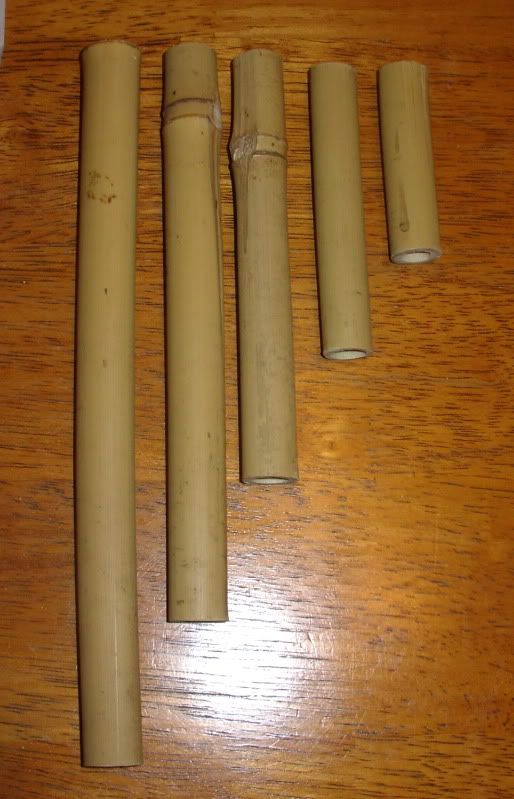
The lengths that I used for the wind chime in the picture are 8", 6 1/2", 5", 3 1/2", and 2".
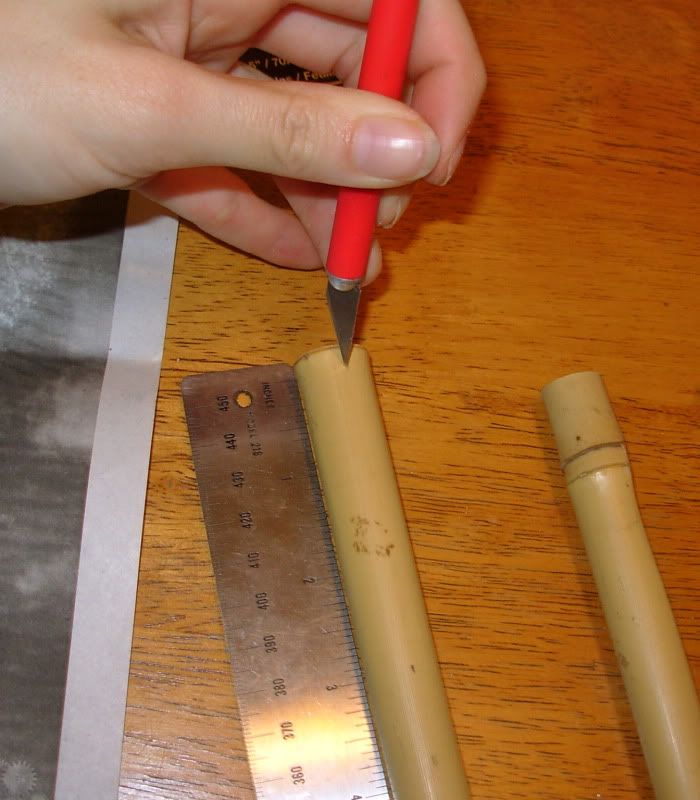
Step 3: Cut the bamboo using your measurements.
Clamp the Miter Saw Box onto the edge of a sturdy table and then clamp the bamboo to the box. I'm right handed so I used my left hand to sturdy the box and used my right to saw. If you are left handed you can reverse the setup.
BE CAREFUL AND WEAR GOGGLES.
Cut your longest piece from the widest end of the bamboo. Continue on up the bamboo so that as each piece is gradually shorter it is also gradually smaller in diameter.
Once you start sawing don't stop! Just have at it.
Sometimes the edge of the bamboo might splinter. When this happened I would take the clamp off and rotate the bamboo so the side that is left to saw through is closer to the top. Be careful if you do this though, or you might end up with two saw marks in different spots.
After you are done sawing you should have bamboo lengths that look like this:
Step 4: Drill out the inside of the bamboo.
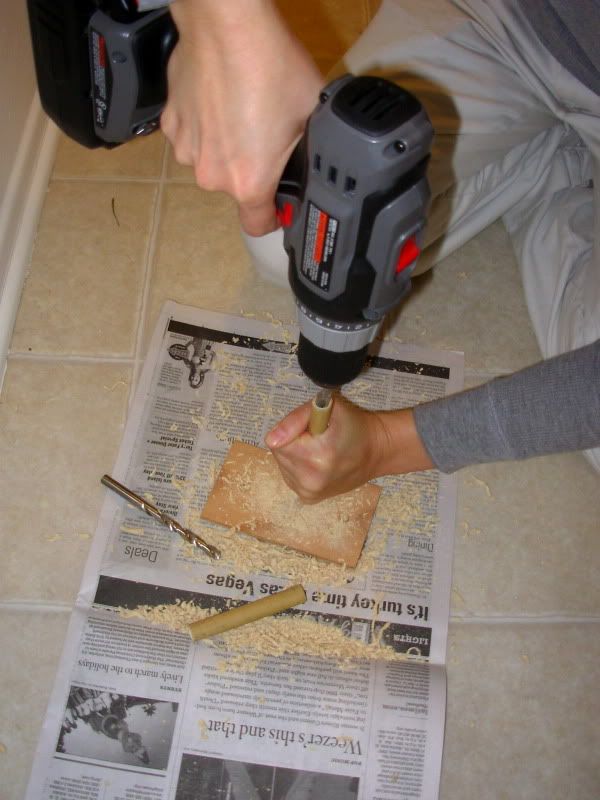
Hold the base of the bamboo piece against the ground and use the 1/2" drill bit to clear out the center of the bamboo. If you have trouble starting it you can use a slightly smaller bit first.
This takes some practice if you are like me and have rarely used a drill. I practiced on some scrap pieces before drilling into my project pieces. Some tips include to let the weight of the drill do most of the work. You don't need to really press into the bamboo. Make sure that you periodically take the drill out of the bamboo to empty the bit.
You must have a very firm grip on the bamboo or this will not work! If you have access to a garage full of tools there might be a vise or something like it that could hold the bamboo for you.
Step 5: Measure and cut a length of bamboo for the top.
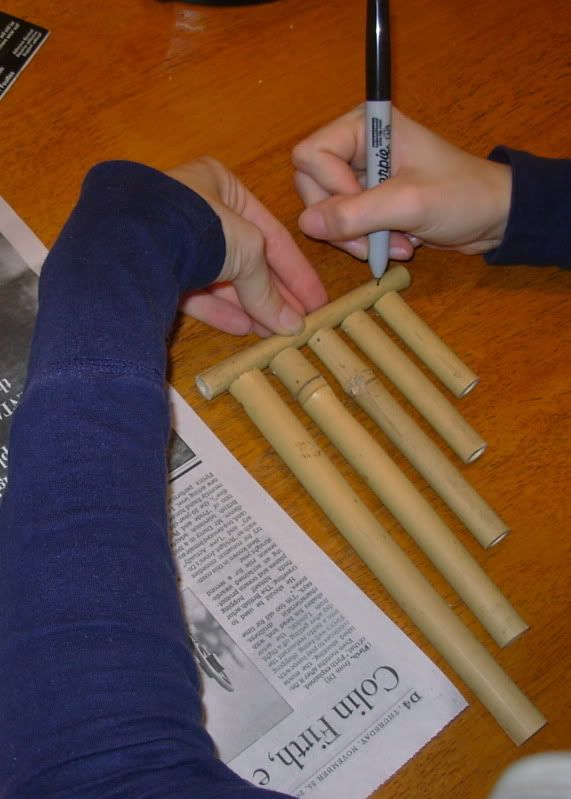
With all your pieces ready to go you now can measure for the top piece. Lay out the bamboo on the table with a small gap in between each piece, about a quarter of an inch. This space will give the pieces room to move.
Mark the bamboo at the point where you will cut it. You want the length to have a little bit of overhang over the two edges.
Step 6: Measure and mark 1/8" from the top on opposite sides of the piece where you will drill the holes for the top of the bamboo.
Imagine you are going to drill straight through the pole. This would produce two holes on opposite sides of the piece. This is what you are going to mark, but not what you are going to do.
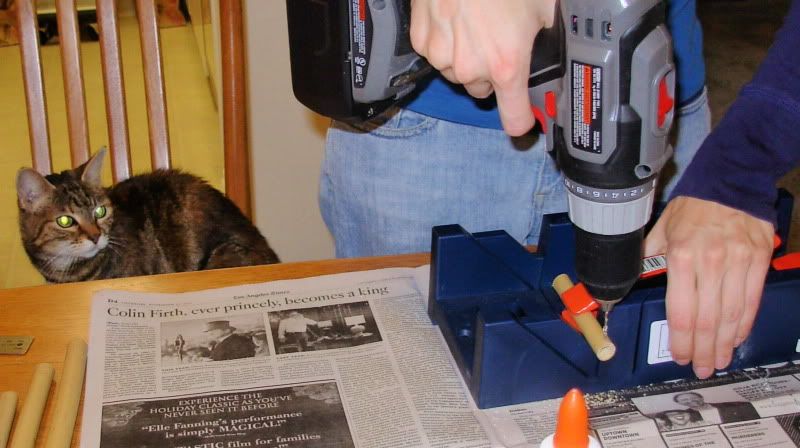
Step 7: Using the 5/64" bit, drill through one side of the bamboo, turn the piece over, and drill the hole in the other side. Have your cat supervise.
My Miter Saw Box had a groove in it that held the bamboo nicely. I used a clamp to hold the smaller pieces in place while drilling.
You want to turn your piece over instead of drilling straight through because the bamboo will not split as much if you do it this way.
Step 8: Lay out and mark the top where you will drill holes for the top piece.
It is important to have your chimes all laid out where they will end up in the end. Mark on top of the top piece where the middle of each chime is.
Step 9: Drill through the top piece on your marks using the 1/16" bit.
This time you are going to drill straight through the piece of bamboo. This will mean that there will probably be some light splintering in the wood, but it's on the bottom and the next step will take care of that.
Step 10: Sand any rough edges.
Any hanging pieces of bamboo or rough edges can be sanded away. This doesn't need to be perfect, just enough to get the rough edges out.
If you want to paint or stain your wind chimes you can go to town sanding and then paint or stain.
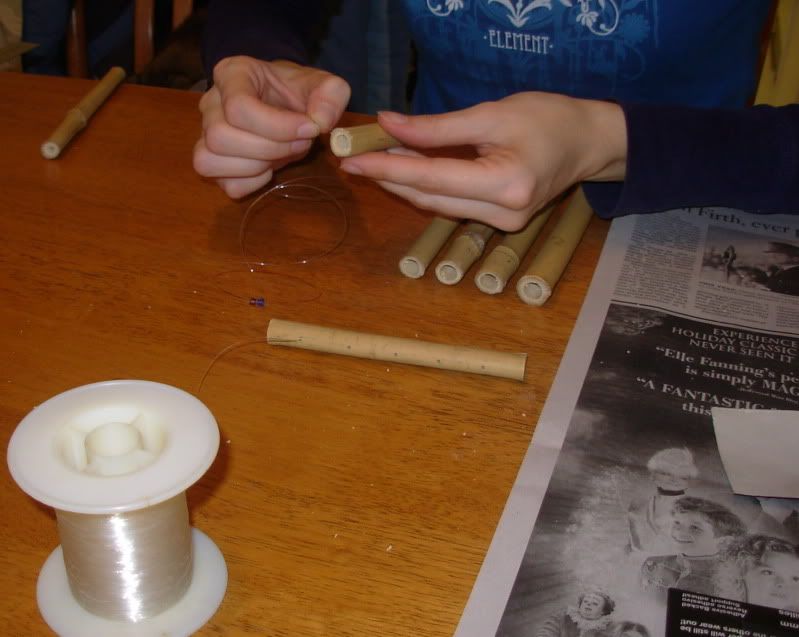
Step 11: Thread your chimes together.
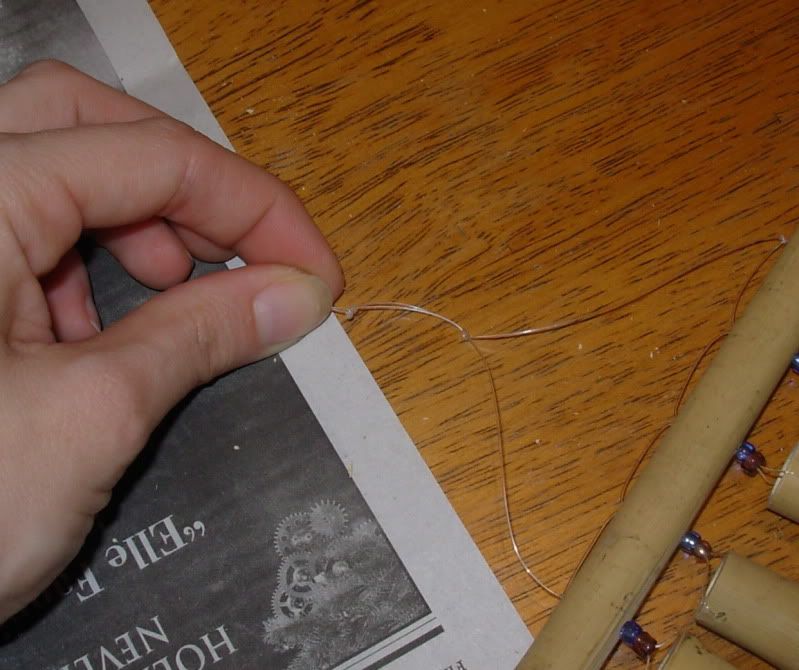
Using fishing line go through the top of your top piece and come out the bottom. Thread a bead or two on the line. Thread the bamboo piece on going through one side and coming out the other. Go back up through the beads again and up the same hole in the top piece. Go down the next hole in the top piece and repeat the process.
Once you are done threading tighten everything up and straighten any of the chimes out that might be crooked. The fishing line should be coming up out the two sides of the top piece. Tie a knot at either edge flush with the top piece to prevent the line from moving around.
Step 12: Tie two knots in the top to hang the chimes by.
Holding the chimes up tie your first knot so that the chimes are not slanted one way or the other. Tie a second knot about 3/4" lower. This loop is where the chime will hang. You could also attach a key ring here instead.
I decided to make some bamboo wind chimes as gifts for various people in my life. The pole cost $3.75, I made two wind chimes out of it, and the process only took a couple of hours.
I'm not an avid wood worker and I'm not a professional. I had fun making this and I hope you do too! However, don't expect perfect results.
I did all of this at my kitchen table!
If you have questions please feel free to comment. All comments are emailed to me. I may edit this from time to time to clarify.
There are some tutorials online here and there, but nothing that I really liked, so I made up my own. Without further ado, here is the Bamboo Wind Chime Tutorial.
Materials
- Bamboo Pole
- Miter Box Saw
- Miter Saw Box
- 2 Clamps
- Drill
- 1/2, 3/8, 5/16, 5/64 and 1/16 Drill Bits
- Ruler
- Sandpaper
- Fishing Line
- Beads (optional)
I bought a length of bamboo from my local hardware store in the outdoor section. They have bamboo there that gardeners use for stakes. I found the pole with the largest diameter I could get, which was about 1". A pole with a larger bore would likely be easier to work with.
All of the tools I used can be found at a hardware store or in the garage of a handy person in your life (I used all of Terri's tools).
Step 2: Decide on graduated lengths that you will cut into the bamboo.
The length of the bamboo will affect the pitch that it sounds. It is best to have 1 1/2" or more of a difference between each length.
My 1/2" drill bit is a little over 4" long. Since later in the process I am going to drill out the bore of the bamboo the longest piece can't be more than 8". If you have an extension for your drill bits your longest piece can be longer.
The lengths that I used for the wind chime in the picture are 8", 6 1/2", 5", 3 1/2", and 2".
Step 3: Cut the bamboo using your measurements.
Clamp the Miter Saw Box onto the edge of a sturdy table and then clamp the bamboo to the box. I'm right handed so I used my left hand to sturdy the box and used my right to saw. If you are left handed you can reverse the setup.
BE CAREFUL AND WEAR GOGGLES.
Cut your longest piece from the widest end of the bamboo. Continue on up the bamboo so that as each piece is gradually shorter it is also gradually smaller in diameter.
Once you start sawing don't stop! Just have at it.
Sometimes the edge of the bamboo might splinter. When this happened I would take the clamp off and rotate the bamboo so the side that is left to saw through is closer to the top. Be careful if you do this though, or you might end up with two saw marks in different spots.
After you are done sawing you should have bamboo lengths that look like this:
Step 4: Drill out the inside of the bamboo.
Hold the base of the bamboo piece against the ground and use the 1/2" drill bit to clear out the center of the bamboo. If you have trouble starting it you can use a slightly smaller bit first.
This takes some practice if you are like me and have rarely used a drill. I practiced on some scrap pieces before drilling into my project pieces. Some tips include to let the weight of the drill do most of the work. You don't need to really press into the bamboo. Make sure that you periodically take the drill out of the bamboo to empty the bit.
You must have a very firm grip on the bamboo or this will not work! If you have access to a garage full of tools there might be a vise or something like it that could hold the bamboo for you.
Step 5: Measure and cut a length of bamboo for the top.
With all your pieces ready to go you now can measure for the top piece. Lay out the bamboo on the table with a small gap in between each piece, about a quarter of an inch. This space will give the pieces room to move.
Mark the bamboo at the point where you will cut it. You want the length to have a little bit of overhang over the two edges.
Step 6: Measure and mark 1/8" from the top on opposite sides of the piece where you will drill the holes for the top of the bamboo.
Imagine you are going to drill straight through the pole. This would produce two holes on opposite sides of the piece. This is what you are going to mark, but not what you are going to do.
Step 7: Using the 5/64" bit, drill through one side of the bamboo, turn the piece over, and drill the hole in the other side. Have your cat supervise.
My Miter Saw Box had a groove in it that held the bamboo nicely. I used a clamp to hold the smaller pieces in place while drilling.
You want to turn your piece over instead of drilling straight through because the bamboo will not split as much if you do it this way.
Step 8: Lay out and mark the top where you will drill holes for the top piece.
It is important to have your chimes all laid out where they will end up in the end. Mark on top of the top piece where the middle of each chime is.
Step 9: Drill through the top piece on your marks using the 1/16" bit.
This time you are going to drill straight through the piece of bamboo. This will mean that there will probably be some light splintering in the wood, but it's on the bottom and the next step will take care of that.
Step 10: Sand any rough edges.
Any hanging pieces of bamboo or rough edges can be sanded away. This doesn't need to be perfect, just enough to get the rough edges out.
If you want to paint or stain your wind chimes you can go to town sanding and then paint or stain.
Step 11: Thread your chimes together.
Using fishing line go through the top of your top piece and come out the bottom. Thread a bead or two on the line. Thread the bamboo piece on going through one side and coming out the other. Go back up through the beads again and up the same hole in the top piece. Go down the next hole in the top piece and repeat the process.
Once you are done threading tighten everything up and straighten any of the chimes out that might be crooked. The fishing line should be coming up out the two sides of the top piece. Tie a knot at either edge flush with the top piece to prevent the line from moving around.
Step 12: Tie two knots in the top to hang the chimes by.
Holding the chimes up tie your first knot so that the chimes are not slanted one way or the other. Tie a second knot about 3/4" lower. This loop is where the chime will hang. You could also attach a key ring here instead.
***
All images and text are my own personal property and you have every right to share the link but no right to claim this as your own.
Sunday, December 19, 2010
Adding Prep to the Wardrobe
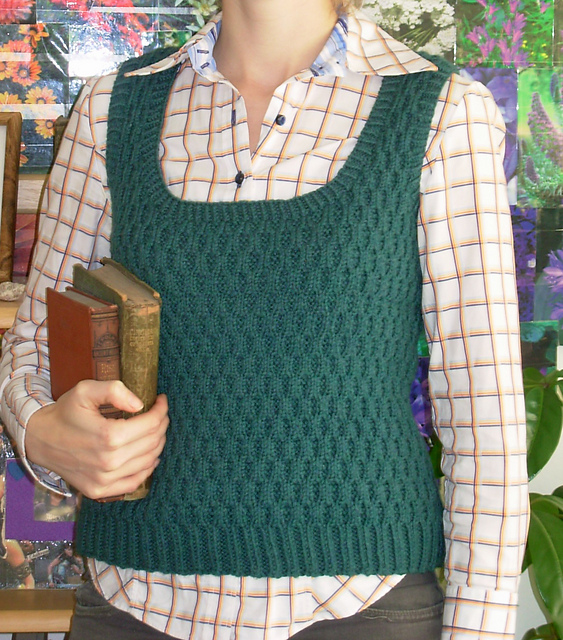
Look I have a finished object to show you! I actually finished quite some time ago, but I only recently had some decent pictures taken of it.
"I should wear that green vest I made today," I thought. "Hmm, I don't have pictures for Ravelry of it."
"Terri! Terri where are you?" I shout as if our two bedroom apartment is some gigantic field which needs shouting over. "Come take pictures of me!" I say brandishing the camera.
This vest came about under uncertain circumstances. Several years ago I owned a bright blue polar fleece vest. I enjoy bright colors and the brightness of that blue added some cheer to the contents of my wardrobe. However, I rarely wore the vest and in one of my recent moves I decided to donate it instead of take it with me.
Regarding my history with the aforementioned vest, why would I then spend many hours making another vest which might prove just as difficult to fit into my wardrobe? I must be very very silly, or just a knitter with yarn and a neat pattern, or maybe both.
I made my dad a sweater a couple of years ago and bought an excess of yarn that I would need. After the sweater was finished I had several balls of Cascade 220 in a lovely dark heather green sitting in my stash. I started fishing around for a pattern that called for the amount of yarn I had left because I'm trying to get my stash under some sort of control.
The pattern for this vest is called Honeycomb and is freeing available from Knitty. Two things helped me choose this pattern over some others I was considering. It called for the yardage I had left and the way it was marketed got me. Preppy you say? Well I could use a little prep in my wardrobe. Becoming a teacher you say? Well that's what I'm going to be very soon. Maybe this vest was right for me.
I enjoyed knitting this vest because it became class knitting. I knit all the time in my classes, but the pattern can't be too complicated or I start paying more attention to my knitting than I do to class. Even though I read in other people's Ravelry pages about the vest I didn't believe them that the cable row took a while. Well, compared to the other ribbing or just knit rows they did take a while! Good thing I like cabling without a needle or I would have hated this vest.
I added a few rows in the waist to make it a little longer. I ended up having just enough yarn to only do five rows of ribbing in the neckline and arm holes instead of the eight called for. Whew! Towards the end I actually had all three areas of ribbing on the needles trying to figure out how much yarn I had left and if I could get away with another row around all three.
I am very pleased with the result and even more pleased that I actually wear it!
"I should wear that green vest I made today," I thought. "Hmm, I don't have pictures for Ravelry of it."
"Terri! Terri where are you?" I shout as if our two bedroom apartment is some gigantic field which needs shouting over. "Come take pictures of me!" I say brandishing the camera.
This vest came about under uncertain circumstances. Several years ago I owned a bright blue polar fleece vest. I enjoy bright colors and the brightness of that blue added some cheer to the contents of my wardrobe. However, I rarely wore the vest and in one of my recent moves I decided to donate it instead of take it with me.
Regarding my history with the aforementioned vest, why would I then spend many hours making another vest which might prove just as difficult to fit into my wardrobe? I must be very very silly, or just a knitter with yarn and a neat pattern, or maybe both.
I made my dad a sweater a couple of years ago and bought an excess of yarn that I would need. After the sweater was finished I had several balls of Cascade 220 in a lovely dark heather green sitting in my stash. I started fishing around for a pattern that called for the amount of yarn I had left because I'm trying to get my stash under some sort of control.
The pattern for this vest is called Honeycomb and is freeing available from Knitty. Two things helped me choose this pattern over some others I was considering. It called for the yardage I had left and the way it was marketed got me. Preppy you say? Well I could use a little prep in my wardrobe. Becoming a teacher you say? Well that's what I'm going to be very soon. Maybe this vest was right for me.
Don't you just adore those books?
I love the smell of old books.
I enjoyed knitting this vest because it became class knitting. I knit all the time in my classes, but the pattern can't be too complicated or I start paying more attention to my knitting than I do to class. Even though I read in other people's Ravelry pages about the vest I didn't believe them that the cable row took a while. Well, compared to the other ribbing or just knit rows they did take a while! Good thing I like cabling without a needle or I would have hated this vest.
I added a few rows in the waist to make it a little longer. I ended up having just enough yarn to only do five rows of ribbing in the neckline and arm holes instead of the eight called for. Whew! Towards the end I actually had all three areas of ribbing on the needles trying to figure out how much yarn I had left and if I could get away with another row around all three.
I am very pleased with the result and even more pleased that I actually wear it!
Subscribe to:
Posts (Atom)