I love thrift stores. I love that I can find awesome things for super cheap. I love the hunt, the search for the great find hiding behind racks of muumuus. I always look for yarn. I have heard of people finding sweater quantities of cashmere/wool yarn at thrift stores for unbelievably cheap. While I have not been that lucky, many years ago I did find this:
I was sure it was good quality lace weight mohair. What I was unsure about was how to use it. I had no idea how much yardage might be in the ball or what I might want to make out of it. And so it pulled up a chair in my stash with some other yarns and commisorated.
"What are you in for?"
"Bulky black and white boucle. I'm too 'busy' for her. Whatever that means."
"How long have you been in here?"
"Five years," the boucle bragged, thinking it had been here longer than the rest.
"Six," said the mohair, "she doesn't even have an Idea for me."
The others gasped. "Really? Not even an Idea? Tsk..."
That's quite enough of that Miss Mohair, because I did think of and execute an Idea this year. I made a small neck scarf for my mother for Christmas. While she is not necessarily the pink person, she does like red and I found the mohair to be a deep enough pink that I decided she would likely wear it. The danger here was that the gift was a surprise and I had no opportunity to play 20 questions in order to figure out something the receipient would certainly wear.
"Are you cold?"
"Where are you cold?"
"Do you like blue? Coral? Teal? Beige?"
"Fringe or no fringe?"
"Long or short?"
"Is there a button shape you like?"
"What are your thoughts on the sizes of button holes?"
Instead I played with fire and knit on the fly. As I'm sure you know by know I am making valiant attempts to get my stash under control, which is how I came to think of an Idea for Miss Mohair. I would make a small neck scarf for my mom. Swatching in mohair is difficult because ripping it out causes pain in my heart as the fibers rip apart; so I just cast on for feather and fan and prayed my knitting mojo would be with me.
For the most part it was. I knit about six inches of feather and fan, looked down and decided it was difficult to see the pattern. Despite being a lace weight yarn knit on size four needles the mohair in the yarn was disguising the pattern. It was too late to go back and jump up three needles sizes so I plunged on ahead.
In order to make the pattern more noticeable I decided to add in some stripes of stockinette. This was a good decision because it made the knitting easier and the ripple of the feather and fan pattern showed up better. I really like the pattern that developed from this problem. I would not have added the stockinette stripes otherwise. I will knit this pattern again in a yarn better suited for it.
Best of all, my mom likes it.
(Miss Mohair is in a new home in my box of leftover balls and is settling in nicely.)
Sunday, December 26, 2010
Monday, December 20, 2010
Bamboo Wind Chime Tutorial
Has it only been one day since my last post? Yes! I'm out of school right now so my blog is going to feel the love!
I decided to make some bamboo wind chimes as gifts for various people in my life. The pole cost $3.75, I made two wind chimes out of it, and the process only took a couple of hours.
I'm not an avid wood worker and I'm not a professional. I had fun making this and I hope you do too! However, don't expect perfect results.
I did all of this at my kitchen table!
If you have questions please feel free to comment. All comments are emailed to me. I may edit this from time to time to clarify.
There are some tutorials online here and there, but nothing that I really liked, so I made up my own. Without further ado, here is the Bamboo Wind Chime Tutorial.
Materials
I bought a length of bamboo from my local hardware store in the outdoor section. They have bamboo there that gardeners use for stakes. I found the pole with the largest diameter I could get, which was about 1". A pole with a larger bore would likely be easier to work with.
All of the tools I used can be found at a hardware store or in the garage of a handy person in your life (I used all of Terri's tools).
Step 2: Decide on graduated lengths that you will cut into the bamboo.
The length of the bamboo will affect the pitch that it sounds. It is best to have 1 1/2" or more of a difference between each length.
My 1/2" drill bit is a little over 4" long. Since later in the process I am going to drill out the bore of the bamboo the longest piece can't be more than 8". If you have an extension for your drill bits your longest piece can be longer.
The lengths that I used for the wind chime in the picture are 8", 6 1/2", 5", 3 1/2", and 2".
Step 3: Cut the bamboo using your measurements.
Clamp the Miter Saw Box onto the edge of a sturdy table and then clamp the bamboo to the box. I'm right handed so I used my left hand to sturdy the box and used my right to saw. If you are left handed you can reverse the setup.
BE CAREFUL AND WEAR GOGGLES.
Cut your longest piece from the widest end of the bamboo. Continue on up the bamboo so that as each piece is gradually shorter it is also gradually smaller in diameter.
Once you start sawing don't stop! Just have at it.
Sometimes the edge of the bamboo might splinter. When this happened I would take the clamp off and rotate the bamboo so the side that is left to saw through is closer to the top. Be careful if you do this though, or you might end up with two saw marks in different spots.
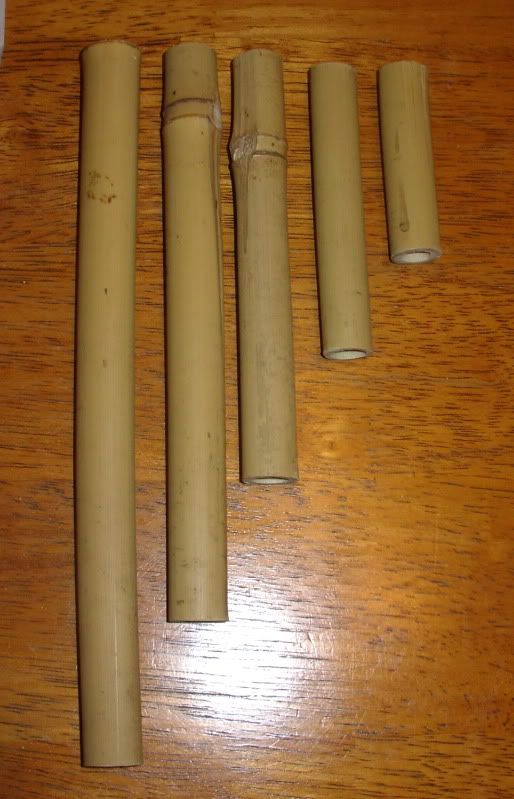
After you are done sawing you should have bamboo lengths that look like this:
Step 4: Drill out the inside of the bamboo.
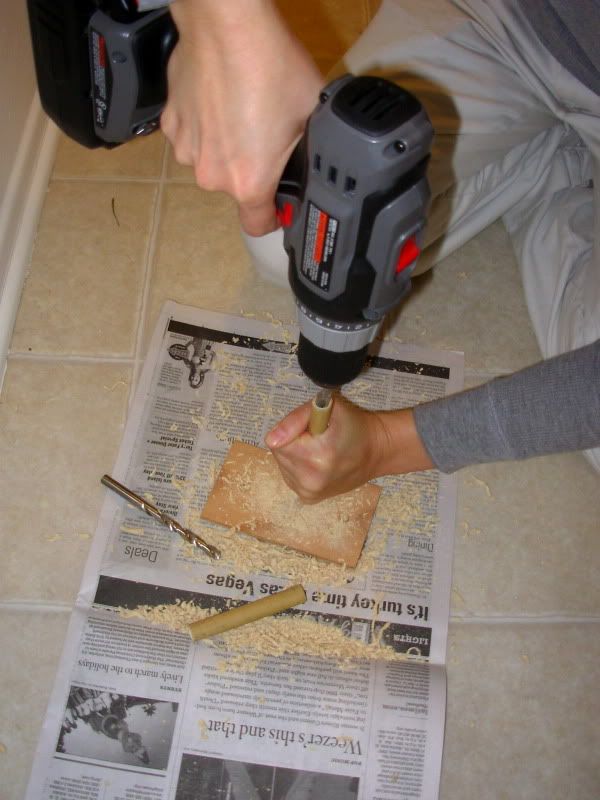
Hold the base of the bamboo piece against the ground and use the 1/2" drill bit to clear out the center of the bamboo. If you have trouble starting it you can use a slightly smaller bit first.
This takes some practice if you are like me and have rarely used a drill. I practiced on some scrap pieces before drilling into my project pieces. Some tips include to let the weight of the drill do most of the work. You don't need to really press into the bamboo. Make sure that you periodically take the drill out of the bamboo to empty the bit.
You must have a very firm grip on the bamboo or this will not work! If you have access to a garage full of tools there might be a vise or something like it that could hold the bamboo for you.
Step 5: Measure and cut a length of bamboo for the top.
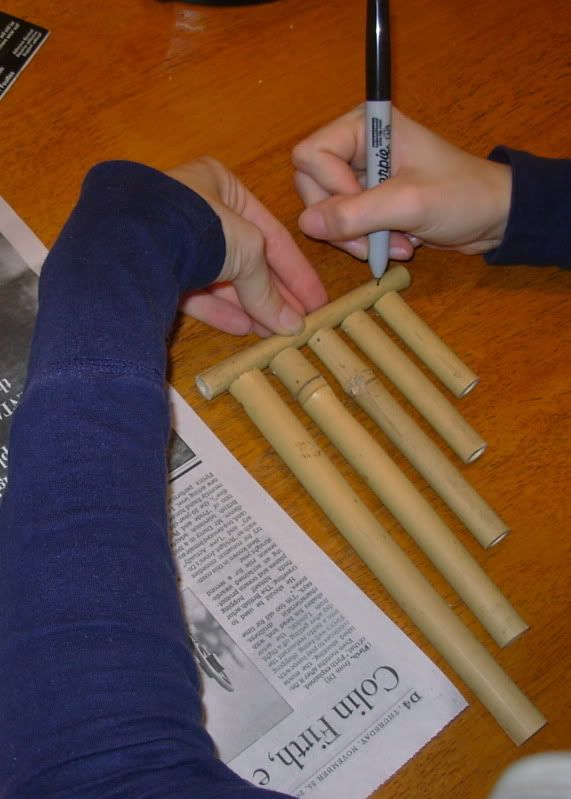
With all your pieces ready to go you now can measure for the top piece. Lay out the bamboo on the table with a small gap in between each piece, about a quarter of an inch. This space will give the pieces room to move.
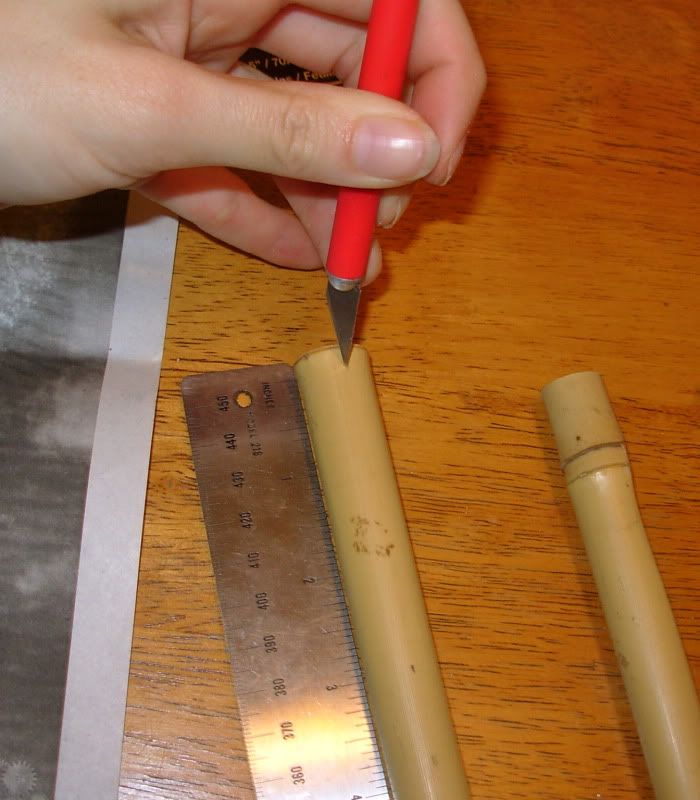
Mark the bamboo at the point where you will cut it. You want the length to have a little bit of overhang over the two edges.
Step 6: Measure and mark 1/8" from the top on opposite sides of the piece where you will drill the holes for the top of the bamboo.
Imagine you are going to drill straight through the pole. This would produce two holes on opposite sides of the piece. This is what you are going to mark, but not what you are going to do.
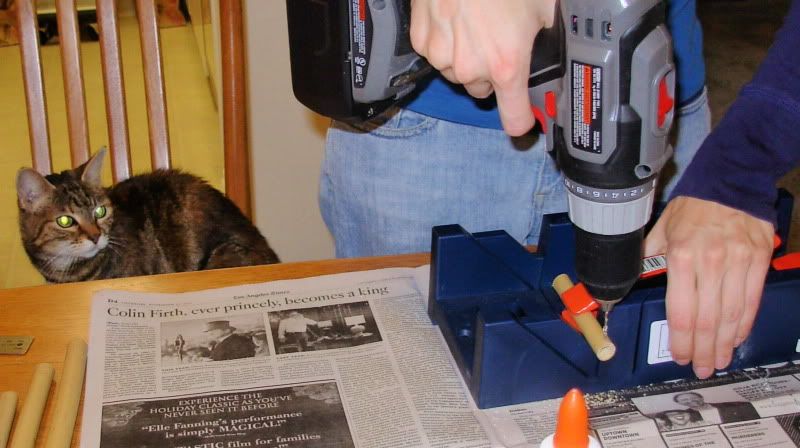
Step 7: Using the 5/64" bit, drill through one side of the bamboo, turn the piece over, and drill the hole in the other side. Have your cat supervise.
My Miter Saw Box had a groove in it that held the bamboo nicely. I used a clamp to hold the smaller pieces in place while drilling.
You want to turn your piece over instead of drilling straight through because the bamboo will not split as much if you do it this way.
Step 8: Lay out and mark the top where you will drill holes for the top piece.
It is important to have your chimes all laid out where they will end up in the end. Mark on top of the top piece where the middle of each chime is.
Step 9: Drill through the top piece on your marks using the 1/16" bit.
This time you are going to drill straight through the piece of bamboo. This will mean that there will probably be some light splintering in the wood, but it's on the bottom and the next step will take care of that.
Step 10: Sand any rough edges.
Any hanging pieces of bamboo or rough edges can be sanded away. This doesn't need to be perfect, just enough to get the rough edges out.
If you want to paint or stain your wind chimes you can go to town sanding and then paint or stain.
Step 11: Thread your chimes together.
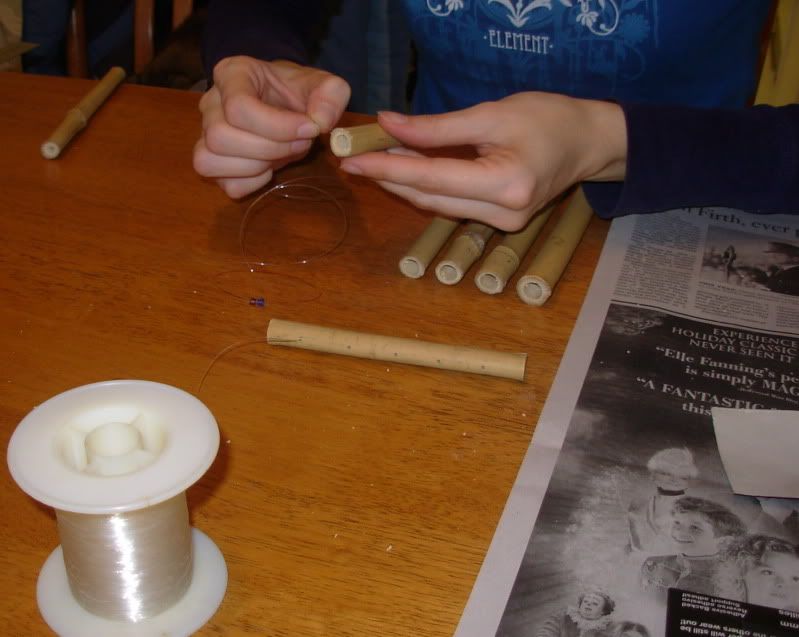
Using fishing line go through the top of your top piece and come out the bottom. Thread a bead or two on the line. Thread the bamboo piece on going through one side and coming out the other. Go back up through the beads again and up the same hole in the top piece. Go down the next hole in the top piece and repeat the process.
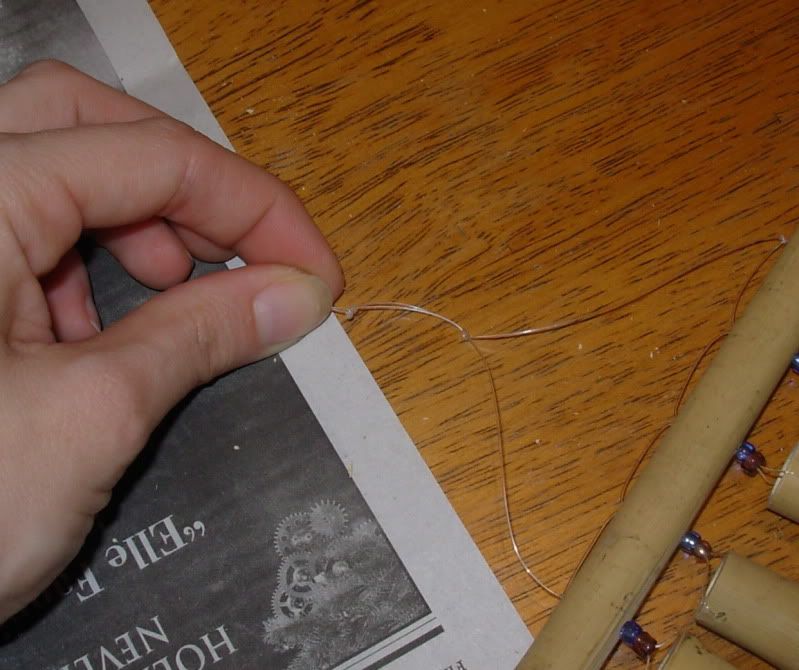
Once you are done threading tighten everything up and straighten any of the chimes out that might be crooked. The fishing line should be coming up out the two sides of the top piece. Tie a knot at either edge flush with the top piece to prevent the line from moving around.
Step 12: Tie two knots in the top to hang the chimes by.
Holding the chimes up tie your first knot so that the chimes are not slanted one way or the other. Tie a second knot about 3/4" lower. This loop is where the chime will hang. You could also attach a key ring here instead.
I decided to make some bamboo wind chimes as gifts for various people in my life. The pole cost $3.75, I made two wind chimes out of it, and the process only took a couple of hours.
I'm not an avid wood worker and I'm not a professional. I had fun making this and I hope you do too! However, don't expect perfect results.
I did all of this at my kitchen table!
If you have questions please feel free to comment. All comments are emailed to me. I may edit this from time to time to clarify.
There are some tutorials online here and there, but nothing that I really liked, so I made up my own. Without further ado, here is the Bamboo Wind Chime Tutorial.
Materials
- Bamboo Pole
- Miter Box Saw
- Miter Saw Box
- 2 Clamps
- Drill
- 1/2, 3/8, 5/16, 5/64 and 1/16 Drill Bits
- Ruler
- Sandpaper
- Fishing Line
- Beads (optional)
I bought a length of bamboo from my local hardware store in the outdoor section. They have bamboo there that gardeners use for stakes. I found the pole with the largest diameter I could get, which was about 1". A pole with a larger bore would likely be easier to work with.
All of the tools I used can be found at a hardware store or in the garage of a handy person in your life (I used all of Terri's tools).
Step 2: Decide on graduated lengths that you will cut into the bamboo.
The length of the bamboo will affect the pitch that it sounds. It is best to have 1 1/2" or more of a difference between each length.
My 1/2" drill bit is a little over 4" long. Since later in the process I am going to drill out the bore of the bamboo the longest piece can't be more than 8". If you have an extension for your drill bits your longest piece can be longer.
The lengths that I used for the wind chime in the picture are 8", 6 1/2", 5", 3 1/2", and 2".
Step 3: Cut the bamboo using your measurements.
Clamp the Miter Saw Box onto the edge of a sturdy table and then clamp the bamboo to the box. I'm right handed so I used my left hand to sturdy the box and used my right to saw. If you are left handed you can reverse the setup.
BE CAREFUL AND WEAR GOGGLES.
Cut your longest piece from the widest end of the bamboo. Continue on up the bamboo so that as each piece is gradually shorter it is also gradually smaller in diameter.
Once you start sawing don't stop! Just have at it.
Sometimes the edge of the bamboo might splinter. When this happened I would take the clamp off and rotate the bamboo so the side that is left to saw through is closer to the top. Be careful if you do this though, or you might end up with two saw marks in different spots.
After you are done sawing you should have bamboo lengths that look like this:
Step 4: Drill out the inside of the bamboo.
Hold the base of the bamboo piece against the ground and use the 1/2" drill bit to clear out the center of the bamboo. If you have trouble starting it you can use a slightly smaller bit first.
This takes some practice if you are like me and have rarely used a drill. I practiced on some scrap pieces before drilling into my project pieces. Some tips include to let the weight of the drill do most of the work. You don't need to really press into the bamboo. Make sure that you periodically take the drill out of the bamboo to empty the bit.
You must have a very firm grip on the bamboo or this will not work! If you have access to a garage full of tools there might be a vise or something like it that could hold the bamboo for you.
Step 5: Measure and cut a length of bamboo for the top.
With all your pieces ready to go you now can measure for the top piece. Lay out the bamboo on the table with a small gap in between each piece, about a quarter of an inch. This space will give the pieces room to move.
Mark the bamboo at the point where you will cut it. You want the length to have a little bit of overhang over the two edges.
Step 6: Measure and mark 1/8" from the top on opposite sides of the piece where you will drill the holes for the top of the bamboo.
Imagine you are going to drill straight through the pole. This would produce two holes on opposite sides of the piece. This is what you are going to mark, but not what you are going to do.
Step 7: Using the 5/64" bit, drill through one side of the bamboo, turn the piece over, and drill the hole in the other side. Have your cat supervise.
My Miter Saw Box had a groove in it that held the bamboo nicely. I used a clamp to hold the smaller pieces in place while drilling.
You want to turn your piece over instead of drilling straight through because the bamboo will not split as much if you do it this way.
Step 8: Lay out and mark the top where you will drill holes for the top piece.
It is important to have your chimes all laid out where they will end up in the end. Mark on top of the top piece where the middle of each chime is.
Step 9: Drill through the top piece on your marks using the 1/16" bit.
This time you are going to drill straight through the piece of bamboo. This will mean that there will probably be some light splintering in the wood, but it's on the bottom and the next step will take care of that.
Step 10: Sand any rough edges.
Any hanging pieces of bamboo or rough edges can be sanded away. This doesn't need to be perfect, just enough to get the rough edges out.
If you want to paint or stain your wind chimes you can go to town sanding and then paint or stain.
Step 11: Thread your chimes together.
Using fishing line go through the top of your top piece and come out the bottom. Thread a bead or two on the line. Thread the bamboo piece on going through one side and coming out the other. Go back up through the beads again and up the same hole in the top piece. Go down the next hole in the top piece and repeat the process.
Once you are done threading tighten everything up and straighten any of the chimes out that might be crooked. The fishing line should be coming up out the two sides of the top piece. Tie a knot at either edge flush with the top piece to prevent the line from moving around.
Step 12: Tie two knots in the top to hang the chimes by.
Holding the chimes up tie your first knot so that the chimes are not slanted one way or the other. Tie a second knot about 3/4" lower. This loop is where the chime will hang. You could also attach a key ring here instead.
***
All images and text are my own personal property and you have every right to share the link but no right to claim this as your own.
Sunday, December 19, 2010
Adding Prep to the Wardrobe
Look I have a finished object to show you! I actually finished quite some time ago, but I only recently had some decent pictures taken of it.
"I should wear that green vest I made today," I thought. "Hmm, I don't have pictures for Ravelry of it."
"Terri! Terri where are you?" I shout as if our two bedroom apartment is some gigantic field which needs shouting over. "Come take pictures of me!" I say brandishing the camera.
This vest came about under uncertain circumstances. Several years ago I owned a bright blue polar fleece vest. I enjoy bright colors and the brightness of that blue added some cheer to the contents of my wardrobe. However, I rarely wore the vest and in one of my recent moves I decided to donate it instead of take it with me.
Regarding my history with the aforementioned vest, why would I then spend many hours making another vest which might prove just as difficult to fit into my wardrobe? I must be very very silly, or just a knitter with yarn and a neat pattern, or maybe both.
I made my dad a sweater a couple of years ago and bought an excess of yarn that I would need. After the sweater was finished I had several balls of Cascade 220 in a lovely dark heather green sitting in my stash. I started fishing around for a pattern that called for the amount of yarn I had left because I'm trying to get my stash under some sort of control.
The pattern for this vest is called Honeycomb and is freeing available from Knitty. Two things helped me choose this pattern over some others I was considering. It called for the yardage I had left and the way it was marketed got me. Preppy you say? Well I could use a little prep in my wardrobe. Becoming a teacher you say? Well that's what I'm going to be very soon. Maybe this vest was right for me.
I enjoyed knitting this vest because it became class knitting. I knit all the time in my classes, but the pattern can't be too complicated or I start paying more attention to my knitting than I do to class. Even though I read in other people's Ravelry pages about the vest I didn't believe them that the cable row took a while. Well, compared to the other ribbing or just knit rows they did take a while! Good thing I like cabling without a needle or I would have hated this vest.
I added a few rows in the waist to make it a little longer. I ended up having just enough yarn to only do five rows of ribbing in the neckline and arm holes instead of the eight called for. Whew! Towards the end I actually had all three areas of ribbing on the needles trying to figure out how much yarn I had left and if I could get away with another row around all three.
I am very pleased with the result and even more pleased that I actually wear it!
"I should wear that green vest I made today," I thought. "Hmm, I don't have pictures for Ravelry of it."
"Terri! Terri where are you?" I shout as if our two bedroom apartment is some gigantic field which needs shouting over. "Come take pictures of me!" I say brandishing the camera.
This vest came about under uncertain circumstances. Several years ago I owned a bright blue polar fleece vest. I enjoy bright colors and the brightness of that blue added some cheer to the contents of my wardrobe. However, I rarely wore the vest and in one of my recent moves I decided to donate it instead of take it with me.
Regarding my history with the aforementioned vest, why would I then spend many hours making another vest which might prove just as difficult to fit into my wardrobe? I must be very very silly, or just a knitter with yarn and a neat pattern, or maybe both.
I made my dad a sweater a couple of years ago and bought an excess of yarn that I would need. After the sweater was finished I had several balls of Cascade 220 in a lovely dark heather green sitting in my stash. I started fishing around for a pattern that called for the amount of yarn I had left because I'm trying to get my stash under some sort of control.
The pattern for this vest is called Honeycomb and is freeing available from Knitty. Two things helped me choose this pattern over some others I was considering. It called for the yardage I had left and the way it was marketed got me. Preppy you say? Well I could use a little prep in my wardrobe. Becoming a teacher you say? Well that's what I'm going to be very soon. Maybe this vest was right for me.
Don't you just adore those books?
I love the smell of old books.
I enjoyed knitting this vest because it became class knitting. I knit all the time in my classes, but the pattern can't be too complicated or I start paying more attention to my knitting than I do to class. Even though I read in other people's Ravelry pages about the vest I didn't believe them that the cable row took a while. Well, compared to the other ribbing or just knit rows they did take a while! Good thing I like cabling without a needle or I would have hated this vest.
I added a few rows in the waist to make it a little longer. I ended up having just enough yarn to only do five rows of ribbing in the neckline and arm holes instead of the eight called for. Whew! Towards the end I actually had all three areas of ribbing on the needles trying to figure out how much yarn I had left and if I could get away with another row around all three.
I am very pleased with the result and even more pleased that I actually wear it!
Monday, December 13, 2010
Neat Beans
It's been a month since my last post. Did the end of the semester come about and make me wish I was an octopus so I could have eight arms to get everything done on time? Why yes, yes that did happen.
Did I also perhaps wonder why I write in this blog? Yes, that happened a lot too. I think about writing more than I actually write. I should just quite thinking so much about it and do it. Blogger tells me that people have been here at least. If it weren't for the stats reassuring me that someone was out there who might have read this I certainly wouldn't have kept writing.
Thanks for reading this, anonymous Internet readers. This is for you. If you perhaps enjoy something I write it would neat beans if you could write and tell me so.
Subscribe to:
Comments (Atom)


