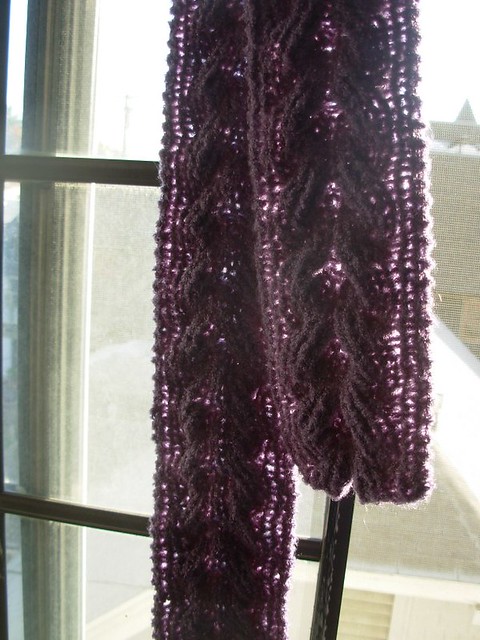
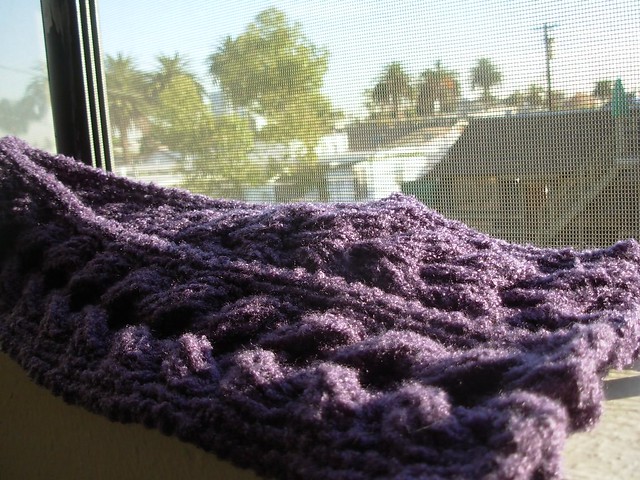
I love thrift stores. I love that I can find awesome things for super cheap. I love the hunt, the search for the great find hiding behind racks of muumuus. I always look for yarn. I have heard of people finding sweater quantities of cashmere/wool yarn at thrift stores for unbelievably cheap. While I have not been that lucky, many years ago I did find this:
I was sure it was good quality lace weight mohair. What I was unsure about was how to use it. I had no idea how much yardage might be in the ball or what I might want to make out of it. And so it pulled up a chair in my stash with some other yarns and commisorated.
"What are you in for?"
"Bulky black and white boucle. I'm too 'busy' for her. Whatever that means."
"How long have you been in here?"
"Five years," the boucle bragged, thinking it had been here longer than the rest.
"Six," said the mohair, "she doesn't even have an Idea for me."
The others gasped. "Really? Not even an Idea? Tsk..."
That's quite enough of that Miss Mohair, because I did think of and execute an Idea this year. I made a small neck scarf for my mother for Christmas. While she is not necessarily the pink person, she does like red and I found the mohair to be a deep enough pink that I decided she would likely wear it. The danger here was that the gift was a surprise and I had no opportunity to play 20 questions in order to figure out something the receipient would certainly wear.
"Are you cold?"
"Where are you cold?"
"Do you like blue? Coral? Teal? Beige?"
"Fringe or no fringe?"
"Long or short?"
"Is there a button shape you like?"
"What are your thoughts on the sizes of button holes?"
Instead I played with fire and knit on the fly. As I'm sure you know by know I am making valiant attempts to get my stash under control, which is how I came to think of an Idea for Miss Mohair. I would make a small neck scarf for my mom. Swatching in mohair is difficult because ripping it out causes pain in my heart as the fibers rip apart; so I just cast on for feather and fan and prayed my knitting mojo would be with me.
For the most part it was. I knit about six inches of feather and fan, looked down and decided it was difficult to see the pattern. Despite being a lace weight yarn knit on size four needles the mohair in the yarn was disguising the pattern. It was too late to go back and jump up three needles sizes so I plunged on ahead.
In order to make the pattern more noticeable I decided to add in some stripes of stockinette. This was a good decision because it made the knitting easier and the ripple of the feather and fan pattern showed up better. I really like the pattern that developed from this problem. I would not have added the stockinette stripes otherwise. I will knit this pattern again in a yarn better suited for it.
Best of all, my mom likes it.
(Miss Mohair is in a new home in my box of leftover balls and is settling in nicely.)
Sunday, December 26, 2010
Monday, December 20, 2010
Bamboo Wind Chime Tutorial
Has it only been one day since my last post? Yes! I'm out of school right now so my blog is going to feel the love!
I decided to make some bamboo wind chimes as gifts for various people in my life. The pole cost $3.75, I made two wind chimes out of it, and the process only took a couple of hours.
I'm not an avid wood worker and I'm not a professional. I had fun making this and I hope you do too! However, don't expect perfect results.
I did all of this at my kitchen table!
If you have questions please feel free to comment. All comments are emailed to me. I may edit this from time to time to clarify.
There are some tutorials online here and there, but nothing that I really liked, so I made up my own. Without further ado, here is the Bamboo Wind Chime Tutorial.
Materials
I bought a length of bamboo from my local hardware store in the outdoor section. They have bamboo there that gardeners use for stakes. I found the pole with the largest diameter I could get, which was about 1". A pole with a larger bore would likely be easier to work with.
All of the tools I used can be found at a hardware store or in the garage of a handy person in your life (I used all of Terri's tools).
Step 2: Decide on graduated lengths that you will cut into the bamboo.
The length of the bamboo will affect the pitch that it sounds. It is best to have 1 1/2" or more of a difference between each length.
My 1/2" drill bit is a little over 4" long. Since later in the process I am going to drill out the bore of the bamboo the longest piece can't be more than 8". If you have an extension for your drill bits your longest piece can be longer.
The lengths that I used for the wind chime in the picture are 8", 6 1/2", 5", 3 1/2", and 2".
Step 3: Cut the bamboo using your measurements.
Clamp the Miter Saw Box onto the edge of a sturdy table and then clamp the bamboo to the box. I'm right handed so I used my left hand to sturdy the box and used my right to saw. If you are left handed you can reverse the setup.
BE CAREFUL AND WEAR GOGGLES.
Cut your longest piece from the widest end of the bamboo. Continue on up the bamboo so that as each piece is gradually shorter it is also gradually smaller in diameter.
Once you start sawing don't stop! Just have at it.
Sometimes the edge of the bamboo might splinter. When this happened I would take the clamp off and rotate the bamboo so the side that is left to saw through is closer to the top. Be careful if you do this though, or you might end up with two saw marks in different spots.
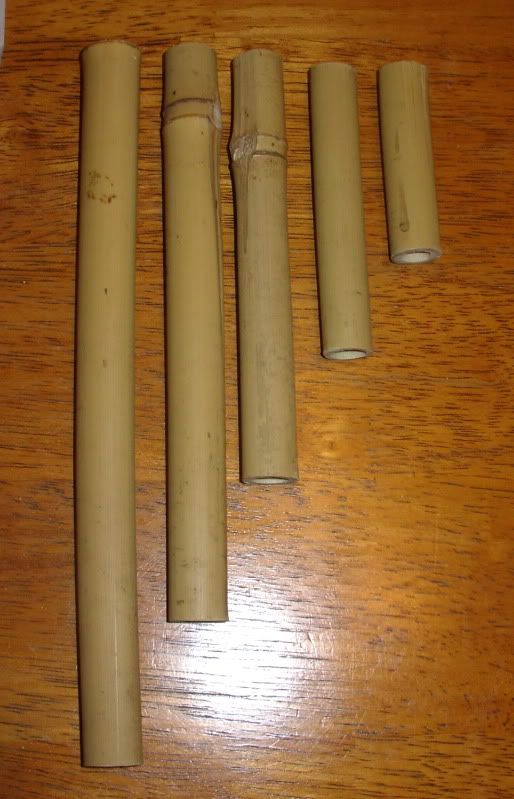
After you are done sawing you should have bamboo lengths that look like this:
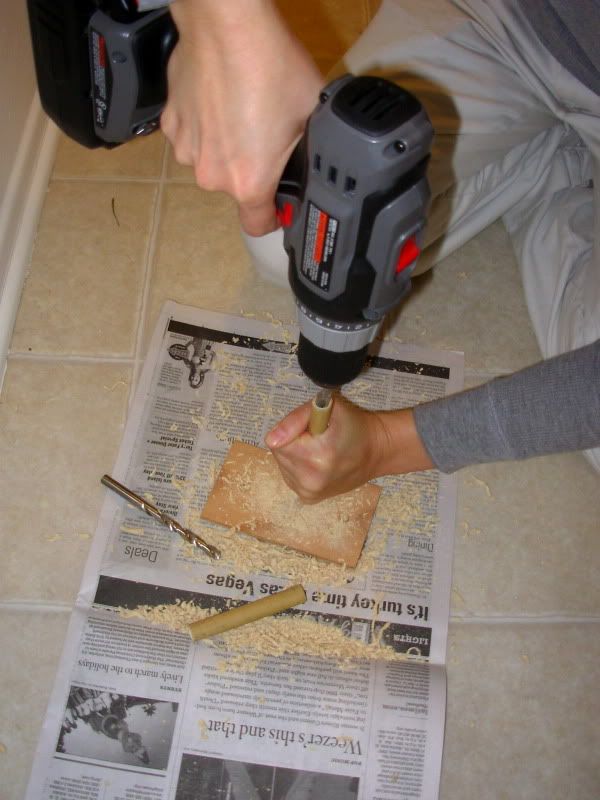
Step 4: Drill out the inside of the bamboo.
Hold the base of the bamboo piece against the ground and use the 1/2" drill bit to clear out the center of the bamboo. If you have trouble starting it you can use a slightly smaller bit first.
This takes some practice if you are like me and have rarely used a drill. I practiced on some scrap pieces before drilling into my project pieces. Some tips include to let the weight of the drill do most of the work. You don't need to really press into the bamboo. Make sure that you periodically take the drill out of the bamboo to empty the bit.
You must have a very firm grip on the bamboo or this will not work! If you have access to a garage full of tools there might be a vise or something like it that could hold the bamboo for you.
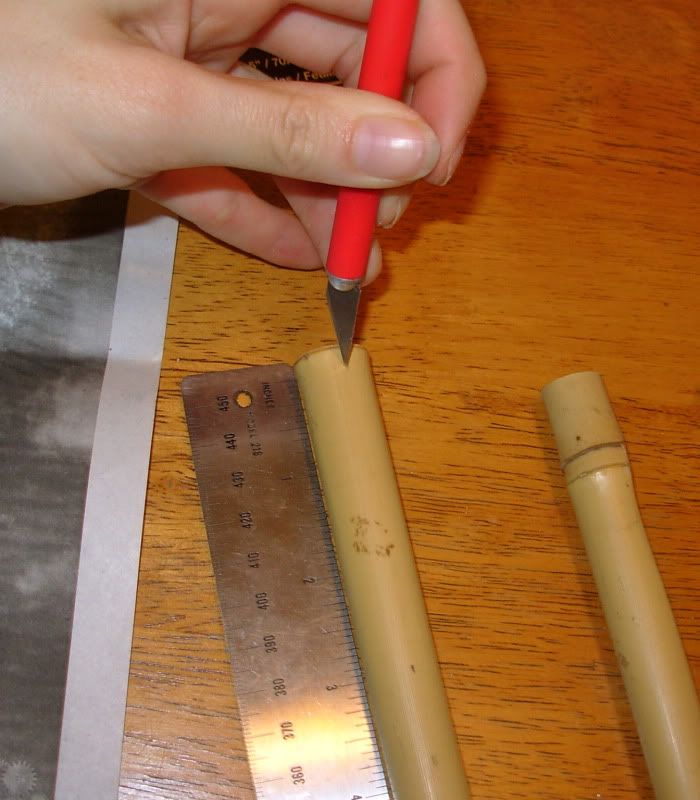
Step 5: Measure and cut a length of bamboo for the top.
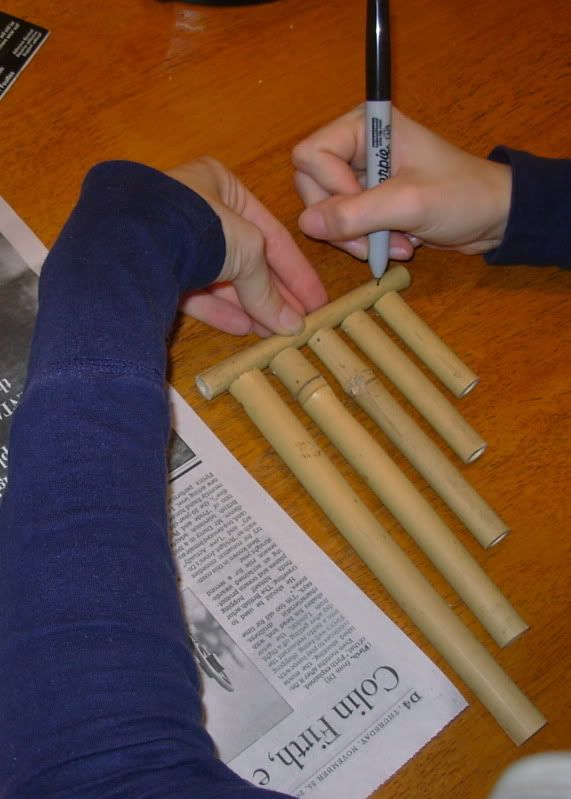
With all your pieces ready to go you now can measure for the top piece. Lay out the bamboo on the table with a small gap in between each piece, about a quarter of an inch. This space will give the pieces room to move.
Mark the bamboo at the point where you will cut it. You want the length to have a little bit of overhang over the two edges.
Step 6: Measure and mark 1/8" from the top on opposite sides of the piece where you will drill the holes for the top of the bamboo.
Imagine you are going to drill straight through the pole. This would produce two holes on opposite sides of the piece. This is what you are going to mark, but not what you are going to do.
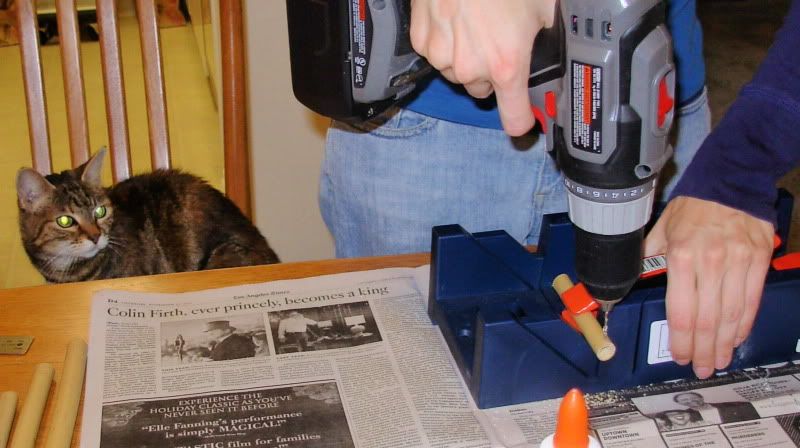
Step 7: Using the 5/64" bit, drill through one side of the bamboo, turn the piece over, and drill the hole in the other side. Have your cat supervise.
My Miter Saw Box had a groove in it that held the bamboo nicely. I used a clamp to hold the smaller pieces in place while drilling.
You want to turn your piece over instead of drilling straight through because the bamboo will not split as much if you do it this way.
Step 8: Lay out and mark the top where you will drill holes for the top piece.
It is important to have your chimes all laid out where they will end up in the end. Mark on top of the top piece where the middle of each chime is.
Step 9: Drill through the top piece on your marks using the 1/16" bit.
This time you are going to drill straight through the piece of bamboo. This will mean that there will probably be some light splintering in the wood, but it's on the bottom and the next step will take care of that.
Step 10: Sand any rough edges.
Any hanging pieces of bamboo or rough edges can be sanded away. This doesn't need to be perfect, just enough to get the rough edges out.
If you want to paint or stain your wind chimes you can go to town sanding and then paint or stain.
Step 11: Thread your chimes together.
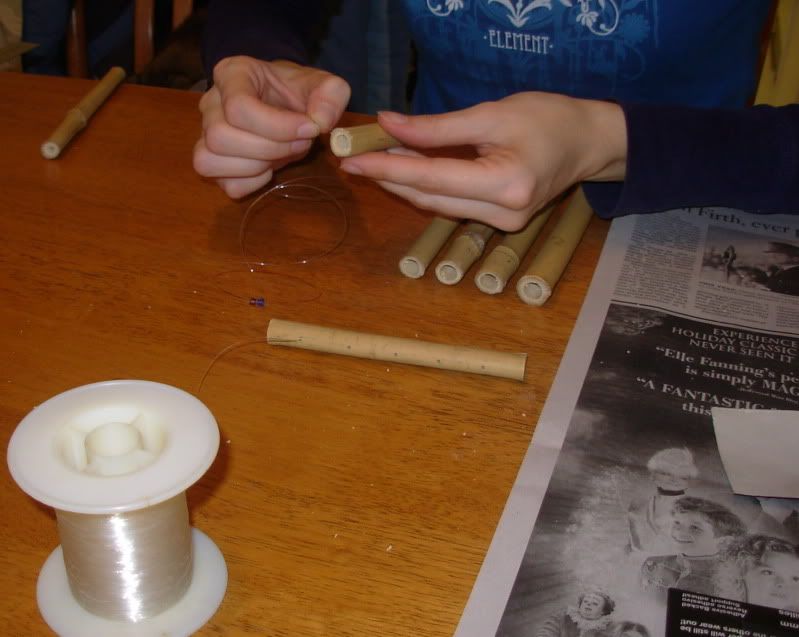
Using fishing line go through the top of your top piece and come out the bottom. Thread a bead or two on the line. Thread the bamboo piece on going through one side and coming out the other. Go back up through the beads again and up the same hole in the top piece. Go down the next hole in the top piece and repeat the process.
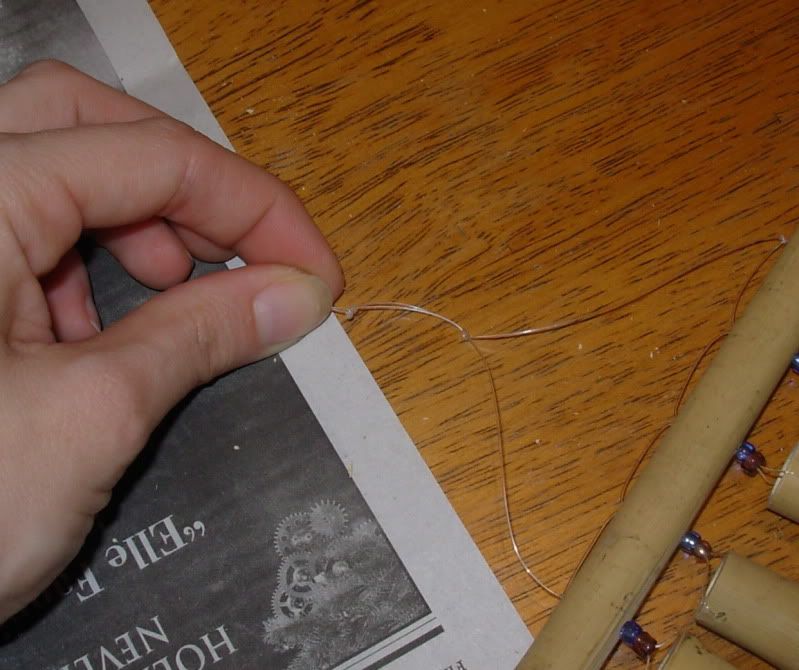
Once you are done threading tighten everything up and straighten any of the chimes out that might be crooked. The fishing line should be coming up out the two sides of the top piece. Tie a knot at either edge flush with the top piece to prevent the line from moving around.
Step 12: Tie two knots in the top to hang the chimes by.
Holding the chimes up tie your first knot so that the chimes are not slanted one way or the other. Tie a second knot about 3/4" lower. This loop is where the chime will hang. You could also attach a key ring here instead.
I decided to make some bamboo wind chimes as gifts for various people in my life. The pole cost $3.75, I made two wind chimes out of it, and the process only took a couple of hours.
I'm not an avid wood worker and I'm not a professional. I had fun making this and I hope you do too! However, don't expect perfect results.
I did all of this at my kitchen table!
If you have questions please feel free to comment. All comments are emailed to me. I may edit this from time to time to clarify.
There are some tutorials online here and there, but nothing that I really liked, so I made up my own. Without further ado, here is the Bamboo Wind Chime Tutorial.
Materials
- Bamboo Pole
- Miter Box Saw
- Miter Saw Box
- 2 Clamps
- Drill
- 1/2, 3/8, 5/16, 5/64 and 1/16 Drill Bits
- Ruler
- Sandpaper
- Fishing Line
- Beads (optional)
I bought a length of bamboo from my local hardware store in the outdoor section. They have bamboo there that gardeners use for stakes. I found the pole with the largest diameter I could get, which was about 1". A pole with a larger bore would likely be easier to work with.
All of the tools I used can be found at a hardware store or in the garage of a handy person in your life (I used all of Terri's tools).
Step 2: Decide on graduated lengths that you will cut into the bamboo.
The length of the bamboo will affect the pitch that it sounds. It is best to have 1 1/2" or more of a difference between each length.
My 1/2" drill bit is a little over 4" long. Since later in the process I am going to drill out the bore of the bamboo the longest piece can't be more than 8". If you have an extension for your drill bits your longest piece can be longer.
The lengths that I used for the wind chime in the picture are 8", 6 1/2", 5", 3 1/2", and 2".
Step 3: Cut the bamboo using your measurements.
Clamp the Miter Saw Box onto the edge of a sturdy table and then clamp the bamboo to the box. I'm right handed so I used my left hand to sturdy the box and used my right to saw. If you are left handed you can reverse the setup.
BE CAREFUL AND WEAR GOGGLES.
Cut your longest piece from the widest end of the bamboo. Continue on up the bamboo so that as each piece is gradually shorter it is also gradually smaller in diameter.
Once you start sawing don't stop! Just have at it.
Sometimes the edge of the bamboo might splinter. When this happened I would take the clamp off and rotate the bamboo so the side that is left to saw through is closer to the top. Be careful if you do this though, or you might end up with two saw marks in different spots.
After you are done sawing you should have bamboo lengths that look like this:
Step 4: Drill out the inside of the bamboo.
Hold the base of the bamboo piece against the ground and use the 1/2" drill bit to clear out the center of the bamboo. If you have trouble starting it you can use a slightly smaller bit first.
This takes some practice if you are like me and have rarely used a drill. I practiced on some scrap pieces before drilling into my project pieces. Some tips include to let the weight of the drill do most of the work. You don't need to really press into the bamboo. Make sure that you periodically take the drill out of the bamboo to empty the bit.
You must have a very firm grip on the bamboo or this will not work! If you have access to a garage full of tools there might be a vise or something like it that could hold the bamboo for you.
Step 5: Measure and cut a length of bamboo for the top.
With all your pieces ready to go you now can measure for the top piece. Lay out the bamboo on the table with a small gap in between each piece, about a quarter of an inch. This space will give the pieces room to move.
Mark the bamboo at the point where you will cut it. You want the length to have a little bit of overhang over the two edges.
Step 6: Measure and mark 1/8" from the top on opposite sides of the piece where you will drill the holes for the top of the bamboo.
Imagine you are going to drill straight through the pole. This would produce two holes on opposite sides of the piece. This is what you are going to mark, but not what you are going to do.
Step 7: Using the 5/64" bit, drill through one side of the bamboo, turn the piece over, and drill the hole in the other side. Have your cat supervise.
My Miter Saw Box had a groove in it that held the bamboo nicely. I used a clamp to hold the smaller pieces in place while drilling.
You want to turn your piece over instead of drilling straight through because the bamboo will not split as much if you do it this way.
Step 8: Lay out and mark the top where you will drill holes for the top piece.
It is important to have your chimes all laid out where they will end up in the end. Mark on top of the top piece where the middle of each chime is.
Step 9: Drill through the top piece on your marks using the 1/16" bit.
This time you are going to drill straight through the piece of bamboo. This will mean that there will probably be some light splintering in the wood, but it's on the bottom and the next step will take care of that.
Step 10: Sand any rough edges.
Any hanging pieces of bamboo or rough edges can be sanded away. This doesn't need to be perfect, just enough to get the rough edges out.
If you want to paint or stain your wind chimes you can go to town sanding and then paint or stain.
Step 11: Thread your chimes together.
Using fishing line go through the top of your top piece and come out the bottom. Thread a bead or two on the line. Thread the bamboo piece on going through one side and coming out the other. Go back up through the beads again and up the same hole in the top piece. Go down the next hole in the top piece and repeat the process.
Once you are done threading tighten everything up and straighten any of the chimes out that might be crooked. The fishing line should be coming up out the two sides of the top piece. Tie a knot at either edge flush with the top piece to prevent the line from moving around.
Step 12: Tie two knots in the top to hang the chimes by.
Holding the chimes up tie your first knot so that the chimes are not slanted one way or the other. Tie a second knot about 3/4" lower. This loop is where the chime will hang. You could also attach a key ring here instead.
***
All images and text are my own personal property and you have every right to share the link but no right to claim this as your own.
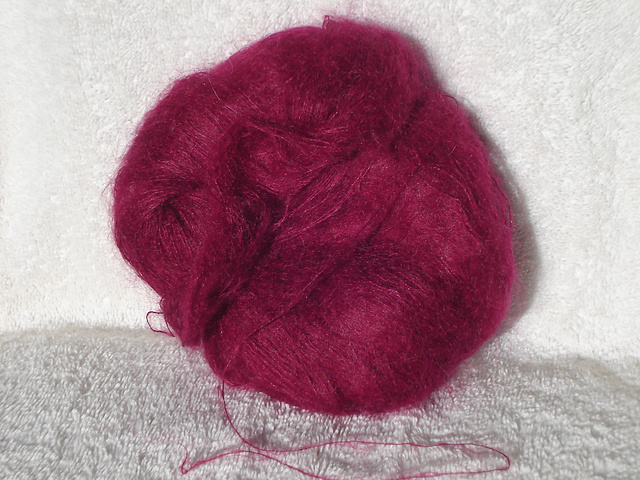
Sunday, December 19, 2010
Adding Prep to the Wardrobe
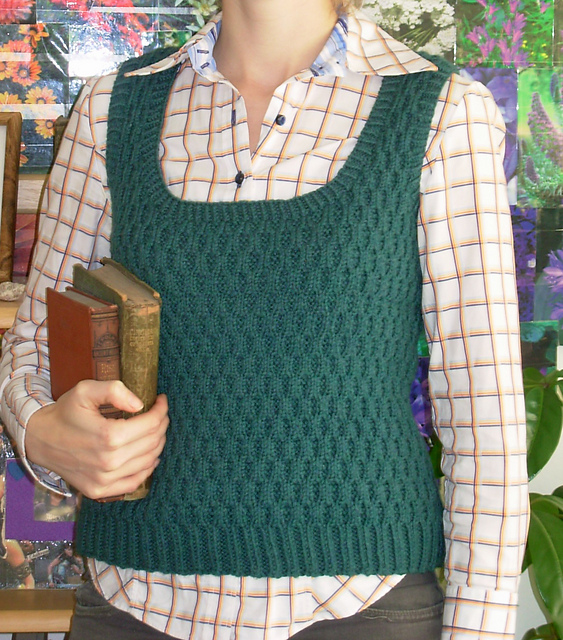
Look I have a finished object to show you! I actually finished quite some time ago, but I only recently had some decent pictures taken of it.
"I should wear that green vest I made today," I thought. "Hmm, I don't have pictures for Ravelry of it."
"Terri! Terri where are you?" I shout as if our two bedroom apartment is some gigantic field which needs shouting over. "Come take pictures of me!" I say brandishing the camera.
This vest came about under uncertain circumstances. Several years ago I owned a bright blue polar fleece vest. I enjoy bright colors and the brightness of that blue added some cheer to the contents of my wardrobe. However, I rarely wore the vest and in one of my recent moves I decided to donate it instead of take it with me.
Regarding my history with the aforementioned vest, why would I then spend many hours making another vest which might prove just as difficult to fit into my wardrobe? I must be very very silly, or just a knitter with yarn and a neat pattern, or maybe both.
I made my dad a sweater a couple of years ago and bought an excess of yarn that I would need. After the sweater was finished I had several balls of Cascade 220 in a lovely dark heather green sitting in my stash. I started fishing around for a pattern that called for the amount of yarn I had left because I'm trying to get my stash under some sort of control.
The pattern for this vest is called Honeycomb and is freeing available from Knitty. Two things helped me choose this pattern over some others I was considering. It called for the yardage I had left and the way it was marketed got me. Preppy you say? Well I could use a little prep in my wardrobe. Becoming a teacher you say? Well that's what I'm going to be very soon. Maybe this vest was right for me.
I enjoyed knitting this vest because it became class knitting. I knit all the time in my classes, but the pattern can't be too complicated or I start paying more attention to my knitting than I do to class. Even though I read in other people's Ravelry pages about the vest I didn't believe them that the cable row took a while. Well, compared to the other ribbing or just knit rows they did take a while! Good thing I like cabling without a needle or I would have hated this vest.
I added a few rows in the waist to make it a little longer. I ended up having just enough yarn to only do five rows of ribbing in the neckline and arm holes instead of the eight called for. Whew! Towards the end I actually had all three areas of ribbing on the needles trying to figure out how much yarn I had left and if I could get away with another row around all three.
I am very pleased with the result and even more pleased that I actually wear it!
"I should wear that green vest I made today," I thought. "Hmm, I don't have pictures for Ravelry of it."
"Terri! Terri where are you?" I shout as if our two bedroom apartment is some gigantic field which needs shouting over. "Come take pictures of me!" I say brandishing the camera.
This vest came about under uncertain circumstances. Several years ago I owned a bright blue polar fleece vest. I enjoy bright colors and the brightness of that blue added some cheer to the contents of my wardrobe. However, I rarely wore the vest and in one of my recent moves I decided to donate it instead of take it with me.
Regarding my history with the aforementioned vest, why would I then spend many hours making another vest which might prove just as difficult to fit into my wardrobe? I must be very very silly, or just a knitter with yarn and a neat pattern, or maybe both.
I made my dad a sweater a couple of years ago and bought an excess of yarn that I would need. After the sweater was finished I had several balls of Cascade 220 in a lovely dark heather green sitting in my stash. I started fishing around for a pattern that called for the amount of yarn I had left because I'm trying to get my stash under some sort of control.
The pattern for this vest is called Honeycomb and is freeing available from Knitty. Two things helped me choose this pattern over some others I was considering. It called for the yardage I had left and the way it was marketed got me. Preppy you say? Well I could use a little prep in my wardrobe. Becoming a teacher you say? Well that's what I'm going to be very soon. Maybe this vest was right for me.
Don't you just adore those books?
I love the smell of old books.
I enjoyed knitting this vest because it became class knitting. I knit all the time in my classes, but the pattern can't be too complicated or I start paying more attention to my knitting than I do to class. Even though I read in other people's Ravelry pages about the vest I didn't believe them that the cable row took a while. Well, compared to the other ribbing or just knit rows they did take a while! Good thing I like cabling without a needle or I would have hated this vest.
I added a few rows in the waist to make it a little longer. I ended up having just enough yarn to only do five rows of ribbing in the neckline and arm holes instead of the eight called for. Whew! Towards the end I actually had all three areas of ribbing on the needles trying to figure out how much yarn I had left and if I could get away with another row around all three.
I am very pleased with the result and even more pleased that I actually wear it!
Monday, December 13, 2010
Neat Beans
It's been a month since my last post. Did the end of the semester come about and make me wish I was an octopus so I could have eight arms to get everything done on time? Why yes, yes that did happen.
Did I also perhaps wonder why I write in this blog? Yes, that happened a lot too. I think about writing more than I actually write. I should just quite thinking so much about it and do it. Blogger tells me that people have been here at least. If it weren't for the stats reassuring me that someone was out there who might have read this I certainly wouldn't have kept writing.
Thanks for reading this, anonymous Internet readers. This is for you. If you perhaps enjoy something I write it would neat beans if you could write and tell me so.
Did I also perhaps wonder why I write in this blog? Yes, that happened a lot too. I think about writing more than I actually write. I should just quite thinking so much about it and do it. Blogger tells me that people have been here at least. If it weren't for the stats reassuring me that someone was out there who might have read this I certainly wouldn't have kept writing.
Thanks for reading this, anonymous Internet readers. This is for you. If you perhaps enjoy something I write it would neat beans if you could write and tell me so.
Sunday, November 14, 2010
Good Consumer. Good.
I feel like this post needs a kind of disclaimer because I am writing in a different style this time. I love snark, wit, and sarcasm and occasionally attempt to put it in my writing. This entry is an exploration of that tone. I'm not entirely sure if I will write more posts this way or even that I needed this disclaimer. Perhaps I'm just avoiding writing the actual post.
...
As a person moves beyond the first stages of learning how to knit they usually begin to be either a product knitter or a process knitter. In other words, they knit because they are product whores or because they enjoy the zen meditation state they fall into as they knit.
The images of these two types of knitters is not without their bias. A product knitter, I imagine, is the kind of consumer that capitalism happily produces, the person who lusts after what they cannot have and who works tirelessly to obtain ever increasing amounts of stuff. This person is the good consumer who, capitalism tells us, keeps our economy going.
The process knitter, on the other hand, sits on the floor in lotus pose calmly knitting through everything and doesn't care if mistakes are made or if the cat starts eating the sweater. This knitter uses good materials to enjoy the process ever more and is occasionally surprised that a finished object occurs at the end of knitting.
My current project has convinced me that I fall squarely into the product camp. I want it like a good consumer wants black friday to hurry up and get here already.
I know that I am a product knitter because I do not enjoy knitting this thing. I made a scarf for a friend some time ago out of a mystery yarn in my stash which I'm sure some well meaning person gifted to me. It is a purple worsted weight acrylic boucle. This means that its a pretty color, kind of lumpy, and splits like a needle going through fabric.
I didn't particularly enjoy knitting the scarf either, but I am trying to use up my stash because I'm poor and buying yarn when I already have lots seems silly. I designed a large reversible cable to go down the middle of the scarf. Why did I try to make a cable, something that needs good stitch definition, in a yarn like boucle that has almost no stitch definition? Because apparently I like to torture myself.
And not just on the one project. My dear friend asked for a matching hat for her coming November birthday. "Of course I'll knit you a hat to match your scarf! I'd love to. I have more of the same yarn too!" Great.
Since the scarf had a cable, the hat needs cables as well, because I need continuity or my brain will explode. That leaves me at today, knitting cables with a yarn I already know won't show cables very well and wishing the stitch definition on the hat was better.
Today I am a product knitter. People ask me why I knit. Sometimes I give them the product answer. I like to knit because of the things I can make. They are unlike anything store bought. They are my own creation. Something I give them the process answer. I like the feel of knitting. I like knowing how the decisions I make about my knitting will affect the finished object. Sometimes, it calms me down. This product/ process debate is really all just a cover up for the fact that I don't know why I am knitter.
I don't know why I am knitting a cabled hat in purple acrylic boucle worsted weight yarn, except that I want it. Except that my friend has been such a good friend to me for so many years. Except that every stitch is totally worth it.
Tuesday, November 9, 2010
Curiosity and the Circle of Compassion
"The tendency to centralize into ourselves, to try to protect ourselves, is strong and all-pervasive. A simple way of turning it around is to develop our curiosity and our inquisitiveness about everything. This is another way of talking about helping others, but of course the process also helps us. We work on ourselves in order to help others, but also we help others in order to work on ourselves. The whole path seems to be about developing curiosity, about looking out and taking an interest in all the details of our lives and in our immediate environment."
Pema Chodron has opened a new world to me. Each of the short meditations in this book has pushed me towards a shift of perspective. I live mostly in a place of concrete. I spend a good portion of each day in my car going to or coming home from school and looking at concrete. My gut reaction has been to lament that I live in such a place, to lament the loss of the vast network of wetlands that was here before the concrete was laid. I wonder where all the animals went that lived here, but really I know that most of them perished. Pema has helped me to, not necessarily get rid of those thoughts, but to see my life and what is in it, to notice, to pay attention instead of dismiss. Instead of yearning to be somewhere I am not, I am paying attention to my own life. After all, I don't want to miss it.
Developing curiosity on the surface seems easy, but really is a radical approach to life. It is not simply to be curious or to notice when you are curious but to actively make yourself be curious.
And what of my knitting? I know the knit and purl stitch so well it feels like I was born knowing them. I know what they look like and what the feel like passing through my fingers. I know that I prefer to knit and that knitting ribbing is getting easier. How can I develop curiosity about something which is so much a part of me?
I pay a lot of attention to my knitting, not out of curiosity, but out of a desire for perfection. The acceptance that I am human and will make mistakes is something I will probably be working towards for the rest of my life. I have come to terms with and know this about myself. For me then, it is turning this rapt attention I have for my knitting into a curiosity rather than scrutiny.
I just finished a scarf for my dad for Christmas. A few weeks ago he asked for a scarf about three days before going on a vacation where it was likely to be cold. I valiantly started without much hope of finishing before he went on the trip and with the idea that it would likely turn into a Christmas gift. Which it has.
The scarf is a wider version of mistake stitch rib. On one row I *knit 3, purl 3* and on the other row I *k1, p1*. The pattern is reversible and deliciously squishy. About halfway through the scarf I noticed that on the *knit 3, purl 3* rows I was knitting a tad bit tighter. This meant that on the knit stitch ridges that the pattern creates, every other stitch was a little tighter than the other stitches. The difference between curiosity and scrutiny is the difference between a curious acceptance of how the pattern looks when I knit it and the desire to make it all be even.
I half-heartedly tried to make it all even but it didn't really work and so I relaxed. This scarf is more me than I could have tried to make it be me. Very few people will ever notice the discrepancy in the stitches that I am talking about. Perhaps the lesson for me in all of this is that I can still develop a curiosity towards my knitting in the way of developing an acceptance and even likeness for the ways I knit that are different from the ways others knit (otherwise known as mistakes).
Sunday, October 17, 2010
In which I encounter a caracal and discover a new yarn shop.
There are two yarn shops that are close to me in Long Beach. One has recently closed its doors and while I have heard they have plans of reopening, who knows when that will actually happen or where they will be. This has left me with one local yarn store which, while a decent store for various reasons, is not the yarn store of my dreams. Many of the people who work there are haughty and I usually can't wait to get out of there. I go only when I desperately need something I know they will have.
This, combined with the opportunity to drive south for over an hour and a half on a day trip meant that I got to stop by Clever Knits, a cute yarn store in Vista, CA. But why was I on a day trip in the first place?
Animal encounters are where they actually have the animals outside their enclosures. The one we saw was just outside on a grassy area. One trainer had the caracal, named Carlton, on a leash and in her other hand was what looked like an oversized cat toy on an really long rope. Just as we got there she started moving the cat toy all over the place and Carlton would run and jump and did some back flips too. It was really an awesome sight to see. When he caught the toy he just sat down and held it in his mouth for a long time as if to say, "Got it! Mine. All mine. Got it."
Before we set out on our adventure I did a little searching on the Internet to see if there would be any yarn shops that we could stop at on our way back. First, I wanted to stop because I am tired of my local yarn store's attitude. Second, one of the best ways for knitters to commemorate a trip is to buy yarn there. And this being a special day celebrating a special occasion, I felt justified in adding to my stash.
I could not be happier with my decision to stop at Clever Knits. The store, like many yarn shops, is rather small. But I have never had a better experience at a yarn store. I felt welcome, appreciated, and valued. I wasn't rushed and I wasn't hassled. No one stared at me.
The woman behind the counter I later found out was the owner's mother. A short haired slender lady with metal rimmed glasses she simply stated to feel free to ask any questions if I needed help. The center of the room is dominated with two sitting areas, one with a couch and several cozy looking chairs in fresh chic prints and the other a long table, perfect for laying out large projects or taking a class. Along one wall was a bookshelf that I simply didn't look into because I knew I would want one of everything, a small basket of five or six bolts of fabric in adorable and modern prints, a wall of hanging patterns, and a notions corner with lantern moon needles that, when I saw them, I almost drooled.
Really, I needed a bib to be in this place because the other wall was covered in yarn. And not just any yarn, yarns I have heard knitters talk about on the internet but that I had never actually seen or touched. There was Malabrigo, unfortunately only in a lime green color or I probably would have bought some. Trekking XXL in one of my favorite dark turquoise colors that faded to black and back again. There were others too, like delicious cashmere and silk blends. The shop also carried a line of organic wool yarns that I had not seen before. Not to be too out in the stratosphere, there was also a large selection of the ever useful Cascade 220.
I decided to go with a ball of sock yarn that is dyed by a local hand dyer. I have been drooling over hand dyed yarns over the Internet and ruining perfectly good keyboards for some time. Apparently the theme of this post is drool. I love supporting local businesses as well as local artists. It helps me make living in a big city not feel so big. The yarn also earned "+2 buy me" because it is various gradations of my current favorite color.
Success.
Monday, October 4, 2010
Cockroach Kitchen - in which I deviate a bit from blathering on about knitting
Terri and I moved to our new apartment several months ago. As you live in a place you start to really get to know the quirks about it, or why it was cheaper than other places you inquired into.
The building went up in the 70's, so much of it is older and in need of some care. When we toured the place the apartment itself seemed very clean with new paint and fixtures and the like. It was one of the cleanest we looked at. And we looked at a lot of places. As we began living here, however, it became aparant that we are not alone.
The saving grace in it all is that they are not everywhere, they are only in the kitchen. The cockroaches take advantage of something I did not know to look out for, an improperly sealed kitchen. There are gaps in every corner and crevice inside the cupboards where wood should meet wall. I'm not even really sure how you could mess up a cupboard install so poorly. Isn't it all supposed to be sealed?
We have tried all the normal options. Roach traps. Borax killer stuff. Telling the management and having the bug man spray. Then I found a gap under the kitchen cabinet that is probably an inch wide. Who knows where it leads but I'm betting somewhere into a neighbor's apartment where they don't care so much about the roaches.
Terri and I have been using foam sealer to try to fill in these gaps. It is seriously easy to use, just shake the can, point and spray. I did a bunch of sealing of the upper cabinets yesterday and got so excited about using it that I forgot to change into grubby clothes and ruined a pair of pants. Oops!
We are on a sealing quest. I don't want to live with cockroaches and I have to do everything in my own power to get them out. I am hoping that sealing will solve a lot of the problems. We just have to make sure to seal everywhere. I'm even going to seal around the dishwasher. Deposit back? Meh, I can scrape all the foam off if I want to when we leave.
After we've sealed everything we can I'm going to get fresh roach traps and have the bug man come spray again.
Despite my determination though, the cockroach has been around a lot longer than we have. Mad props for that.
Wasn't that a lovely digression into cockroaches. Ick! I have actually been knitting quite a lot lately, much more than I had expected. More on that to come, and with pictures too!
Subscribe to:
Posts (Atom)